
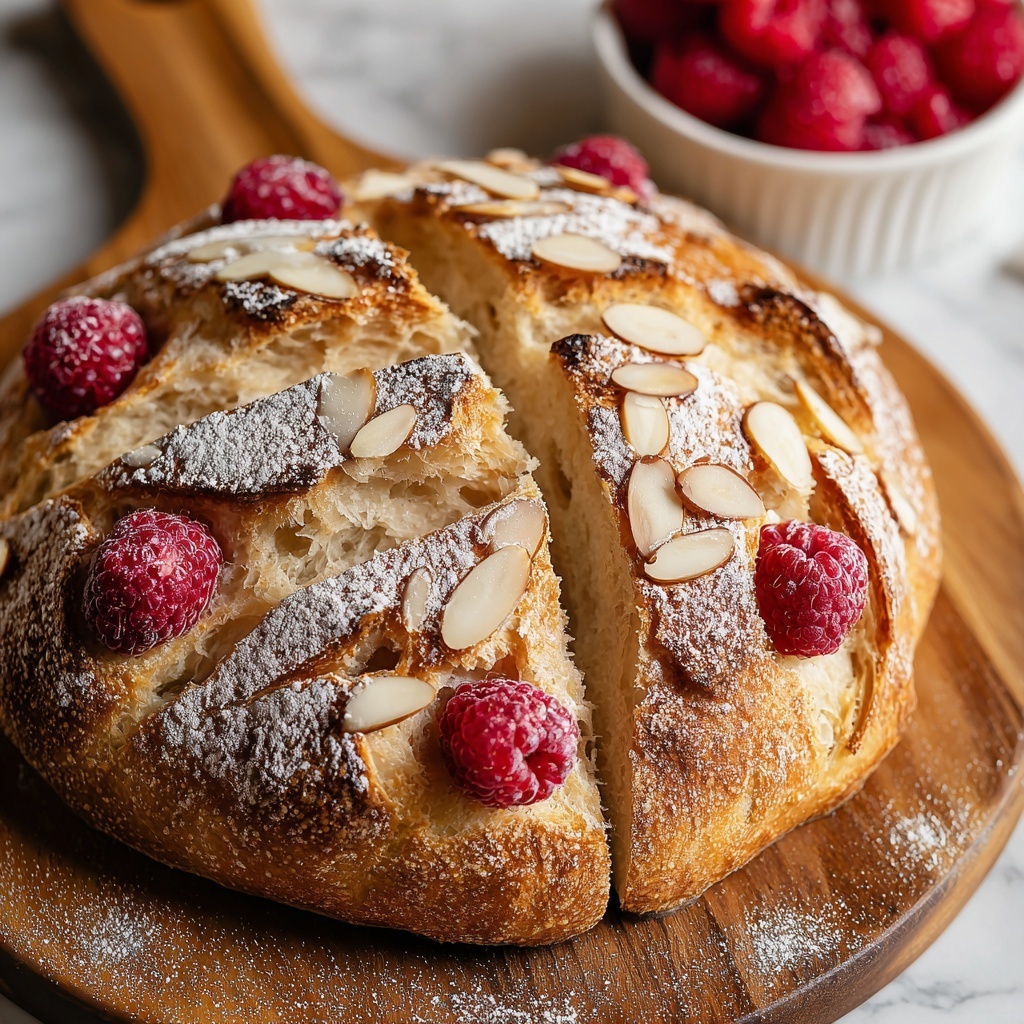
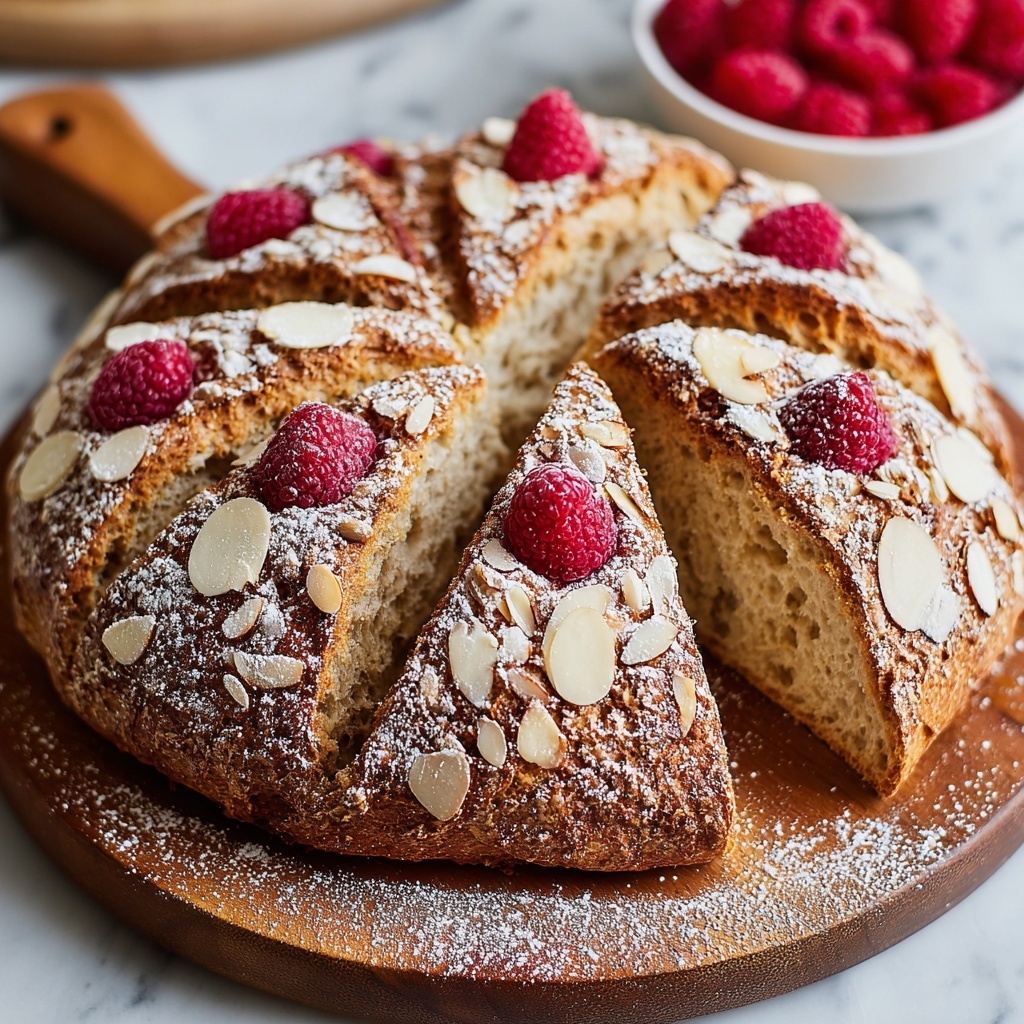
If you love the comforting tang of sourdough combined with a touch of sweet luxury, then let’s dive into the joy of making the Sourdough White Chocolate and Raspberry Bread Recipe. This bread perfectly balances the natural tartness of fresh raspberries with the creamy, melt-in-your-mouth richness of white chocolate. The crust achieves a delightful crunch, while the crumb stays tender and packed with flavorful pockets that make each bite feel like a little celebration. This recipe not only brings artisan-quality bread right into your kitchen but also lets you experience a fruity, sweet twist that will make your baking sessions unforgettable.
Ingredients You’ll Need
Gathering simple but quality ingredients is the secret to nailing this recipe. Each one plays a vital role in shaping texture, flavor, and aroma, making your bread as stunning as it is delicious.
- 500g bread flour: Offers the strong gluten structure needed for a chewy and airy crumb.
- 100g active sourdough starter (100% hydration): Brings natural leavening and that signature sourdough tang that elevates the bread’s complexity.
- 10g salt: Enhances flavor and controls fermentation for balanced taste.
- 325g lukewarm water: Hydrates the dough perfectly, helping flour develop and the starter activate smoothly.
- 100g fresh or frozen raspberries: Adds vibrant bursts of fruity tartness that contrast beautifully with the sweet white chocolate.
- 100g white chocolate chips or chunks: Melts into luscious pockets, creating decadent surprises in every slice.
- Optional extra flour for dusting: Helps with shaping and handling without sticking.
How to Make Sourdough White Chocolate and Raspberry Bread Recipe
Step 1: Mixing and Autolyse
Begin by dissolving your active sourdough starter into lukewarm water in a large bowl. This ensures your starter spreads evenly, giving your bread a consistent rise. Add your bread flour and mix until there’s no trace of dry flour. Let the dough rest covered for 30 minutes—this autolyse phase jumpstarts gluten development and improves dough extensibility, making your bread tender yet structured.
Step 2: Adding Salt and First Rest
After the dough’s initial rest, sprinkle salt evenly over the surface and work it through with wet hands to avoid tearing your dough. The salt not only seasons your bread but also regulates yeast activity for a better rise. Cover again and let it rest for an additional 30 minutes, setting the stage for strong gluten formation.
Step 3: Stretch and Folds with Fruit and Chocolate
Over the next two hours, perform a series of stretch and folds every 30 minutes. This technique gently strengthens the dough’s structure without harsh kneading. On the second or third fold, gently incorporate the raspberries and white chocolate chips. Be delicate to avoid crushing the berries but ensure they get evenly integrated. This step brings that signature fruity and sweet character into every bite.
Step 4: Bulk Fermentation
After your final fold, cover the dough and allow it to rise at room temperature for 4 to 6 hours until it has roughly doubled in size. This fermentation period develops flavor complexity and lets your dough become fluffy with those lovely air pockets we all love in artisan bread.
Step 5: Shaping and Cold Fermentation
Turn your dough out gently onto a lightly floured surface and shape it into a round or oval loaf, handling it with care to retain its airy structure. Place it seam-side up in a banneton dusted with flour or a bowl lined with a floured towel. Cover and refrigerate overnight for 8 to 12 hours. This cold fermentation deepens flavor and improves the bread’s texture dramatically.
Step 6: Baking to Perfection
The next day, preheat your oven to 475°F (245°C) with a Dutch oven inside to get it scorching hot. Transfer your dough onto parchment paper, score the top to control oven spring, and carefully place it inside the Dutch oven. Cover and bake for 20 minutes, then remove the lid and bake for another 20 to 25 minutes until your crust reaches a gorgeous deep golden brown. Cool completely on a wire rack before slicing to let the crumb set beautifully.
How to Serve Sourdough White Chocolate and Raspberry Bread Recipe
Garnishes
This bread shines on its own, but a light spread of softened butter or a drizzle of honey gently complements the white chocolate and raspberry flavors without overpowering them. For an elegant touch, dust a tiny sprinkle of powdered sugar or freeze-dried raspberry powder over slices right before serving.
Side Dishes
Pair slices with a cup of coffee, tea, or even a glass of chilled milk for a breakfast or brunch treat. A bowl of fresh berries or a dollop of whipped cream can add fresh creaminess, making your meal feel like a special occasion.
Creative Ways to Present
Try making mini toast rounds topped with ricotta and a fresh raspberry for delightful appetizers. Alternatively, cube the bread, lightly toast it, and toss with a salad to add an unexpected sweet crunch. Its dual flavor notes mean it can slide seamlessly into both sweet and savory pairings.
Make Ahead and Storage
Storing Leftovers
Store leftover slices in an airtight container at room temperature for up to two days. Because this bread is moist and rich, it’s best enjoyed fresh, but keeping it sealed prevents it from drying out and losing that wonderful texture.
Freezing
If you want to keep your Sourdough White Chocolate and Raspberry Bread Recipe longer, wrap the loaf tightly in plastic wrap and foil and freeze it. It will maintain its quality for up to a month. Slice before freezing for easy portioning when you want a quick indulgence.
Reheating
To bring back the fresh-baked warmth, toast slices lightly or warm them in an oven set to 350°F (175°C) for about 5 to 7 minutes. This refreshes the crunch of the crust and softens the crumb, letting the white chocolate melt slightly again for that perfect bite.
FAQs
Can I use frozen raspberries for the Sourdough White Chocolate and Raspberry Bread Recipe?
Yes, you can! Just add the frozen raspberries directly without thawing to prevent excess juice from soaking into the dough, which keeps your bread from becoming too wet.
What type of white chocolate works best in this bread?
High-quality white chocolate chips or chunks are ideal because they hold shape well during mixing and baking, melting beautifully inside the crumb without becoming too runny.
How long does the cold fermentation improve the bread?
Cold fermentation for 8 to 12 hours enhances flavor and crumb texture significantly. It slows yeast activity, allowing natural enzymes to develop richer, more complex taste notes.
Can I substitute bread flour with all-purpose flour?
While you can use all-purpose flour, bread flour’s higher protein content gives better gluten development and makes the bread chewier and more structured, which is preferable in artisan sourdoughs.
Is this recipe suitable for vegetarians?
Absolutely! All ingredients are vegetarian-friendly, making it a perfect treat for a wide range of diets without sacrificing taste or indulgence.
Final Thoughts
This Sourdough White Chocolate and Raspberry Bread Recipe is a true showstopper that combines artisan sourdough charm with playful bursts of sweetness and tartness. Whether you’re a seasoned baker or just looking to add a stunning loaf to your repertoire, this bread will delight your senses and your guests. I can’t recommend it enough — give it a try, and let this beautiful loaf become your new favorite!
Print
Sourdough White Chocolate and Raspberry Bread Recipe
- Prep Time: 30 minutes (active)
- Cook Time: 45 minutes
- Total Time: 24 hours (including fermentation and resting times)
- Yield: 1 large loaf
- Category: Bread
- Method: Baking
- Cuisine: Artisan
- Diet: Vegetarian
Description
This delightful Sourdough White Chocolate and Raspberry Bread combines the tangy depth of artisan sourdough with bursts of fresh raspberries and sweet white chocolate chunks. Perfectly crusty on the outside and tender within, this bread offers a unique sweet and fruity take on traditional sourdough, ideal for breakfast or a special treat.
Ingredients
Dough Ingredients
- 500g bread flour
- 100g active sourdough starter (100% hydration)
- 10g salt
- 325g lukewarm water
Add-ins
- 100g fresh or frozen raspberries
- 100g white chocolate chips or chunks
Optional
- Extra flour for dusting
Instructions
- Mix and Autolyse: In a large bowl, mix the sourdough starter with lukewarm water until mostly dissolved. Add the bread flour and mix until there are no dry bits left. Cover the bowl and let the dough rest for 30 minutes to hydrate the flour and kickstart gluten development.
- Add Salt and Rest: After the autolyse, sprinkle salt over the dough. Mix it in gently using wet hands to avoid tearing. Cover again and let the dough rest for another 30 minutes, allowing the salt to incorporate fully.
- Stretch and Folds: Perform a series of stretch and folds every 30 minutes for the next 2 hours, totaling about 4 sets. Gently stretch and fold the dough in the bowl to strengthen the gluten network and improve dough structure.
- Incorporate Raspberries and Chocolate: On the second or third set of folds, carefully fold in the raspberries and white chocolate chunks. Handle the raspberries gently to prevent crushing and excessive juice release.
- Bulk Fermentation: After completing the final fold, cover the dough and let it rise at room temperature for 4 to 6 hours until it roughly doubles in size, indicating active fermentation.
- Shape the Dough: Turn the risen dough onto a lightly floured surface. Shape it into a round or oval loaf, then place it seam-side up into a floured banneton or a bowl lined with a floured towel to hold its shape.
- Cold Fermentation: Cover the shaped dough and refrigerate overnight for 8 to 12 hours. This cold fermentation improves flavor and develops a better crumb structure.
- Preheat Oven and Dutch Oven: The next day, preheat your oven to 475°F (245°C) with a Dutch oven inside to heat thoroughly for baking.
- Score and Bake: Carefully transfer the dough onto parchment paper. Score the top with a sharp blade to allow expansion. Place the dough inside the hot Dutch oven, cover it, and bake for 20 minutes.
- Finish Baking: Remove the Dutch oven lid and continue baking for an additional 20 to 25 minutes until the bread is deep golden brown and crusty.
- Cool: Remove the bread from the oven and cool completely on a wire rack before slicing to set the crumb and enhance flavor.
Notes
- If using frozen raspberries, do not thaw before mixing into the dough to avoid releasing excess juice which could affect dough consistency.
- This bread is best enjoyed the day it’s baked, but can be toasted the next day for a delicious fresh taste.


