Description
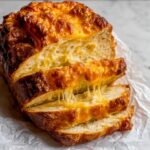
This no-knead cheese bread recipe combines the simplicity of a no-knead dough with the rich, melty goodness of Colby cheese. The bread is made by mixing a sticky dough, letting it rise for a few hours, and baking it in a preheated heavy pot to achieve a crusty exterior and soft, cheesy interior. It’s perfect for those wanting homemade bread without the fuss of kneading.
Ingredients
Scale
Dry Ingredients
- 3 cups bread flour (or plain all-purpose flour)
- 2 tsp instant yeast (aka rapid rise yeast)
- 1 1/2 tsp kosher salt
Wet Ingredients
- 1 1/2 cups very warm tap water
Cheese
- 2 1/2 cups tightly packed freshly shredded Colby cheese (or other cheese of choice)
Instructions
- Mix dry ingredients and water: In a large bowl, combine the bread flour, instant yeast, and kosher salt. Add the very warm tap water and mix with a rubber spatula or the handle of a spatula until all flour is incorporated and a shaggy, sticky dough forms. The dough will be too sticky to knead but not as runny as batter.
- Rise: Cover the bowl with cling wrap and leave the dough in a warm place for 2 to 3 hours, until it doubles in size and the surface appears bubbly with the dough jiggling when shaken.
- Preheat baking pot: About 30 minutes before the dough completes rising, place a heavy-based pot (24-28 cm, 4.5-8 quart) with a lid into the oven and preheat to 240°C (450°F) or 220°C (fan-forced).
- Shape the dough: Lightly flour a work surface with 1 tablespoon of flour. Scrape the risen dough out of the bowl and sprinkle the surface with flour again. Pat the dough gently into a roughly 20 cm (8 inch) disc shape.
- Add cheese layers: Set aside one third of the shredded cheese for topping. Spread half of the remaining cheese evenly over the dough disc.
- Fold dough with cheese: Using a dough scraper or similar tool, fold the dough sides inward four times, layering cheese between each fold except for the very last fold, which remains cheese free. This traps cheese layers inside the bread for a flavorful, melty texture.
- Transfer to parchment paper: Flip the folded dough seam-side down onto a sheet of parchment paper. Shape tidily if needed, then pile the reserved third of cheese on top, creating a cheesy crown.
- Bake covered: Remove the hot pot from the oven. Using the parchment paper, carefully transfer the dough into the pot, keeping it on the paper. Cover with the lid and bake for 35 minutes.
- Bake uncovered: Remove the lid and continue baking for an additional 10 minutes to brown and color the surface.
- Cool before slicing: Remove the pot from the oven and use the parchment paper to transfer the bread onto a cooling rack. Remove the parchment paper and let the bread cool for at least 10 minutes before slicing to allow the texture to set properly.
Notes
- The use of bread flour is recommended for structure, but plain or all-purpose flour can be used as a substitute.
- Instant yeast helps shorten the rising time; rapid-rise yeast works well.
- Very warm tap water (not boiling) activates the yeast effectively.
- Colby cheese is suggested but you can use other semi-hard cheeses like cheddar or Monterey Jack for variety.
- Rising times may vary depending on room temperature; dough should double in size.
- Folding cheese into the dough creates pockets of melty cheese inside the bread, enhancing flavor and texture.
- If you don’t have a heavy pot or dutch oven, alternative baking methods can be used but may affect crust quality.
- Allowing the bread to cool before slicing ensures the crumb is set and not gummy.
