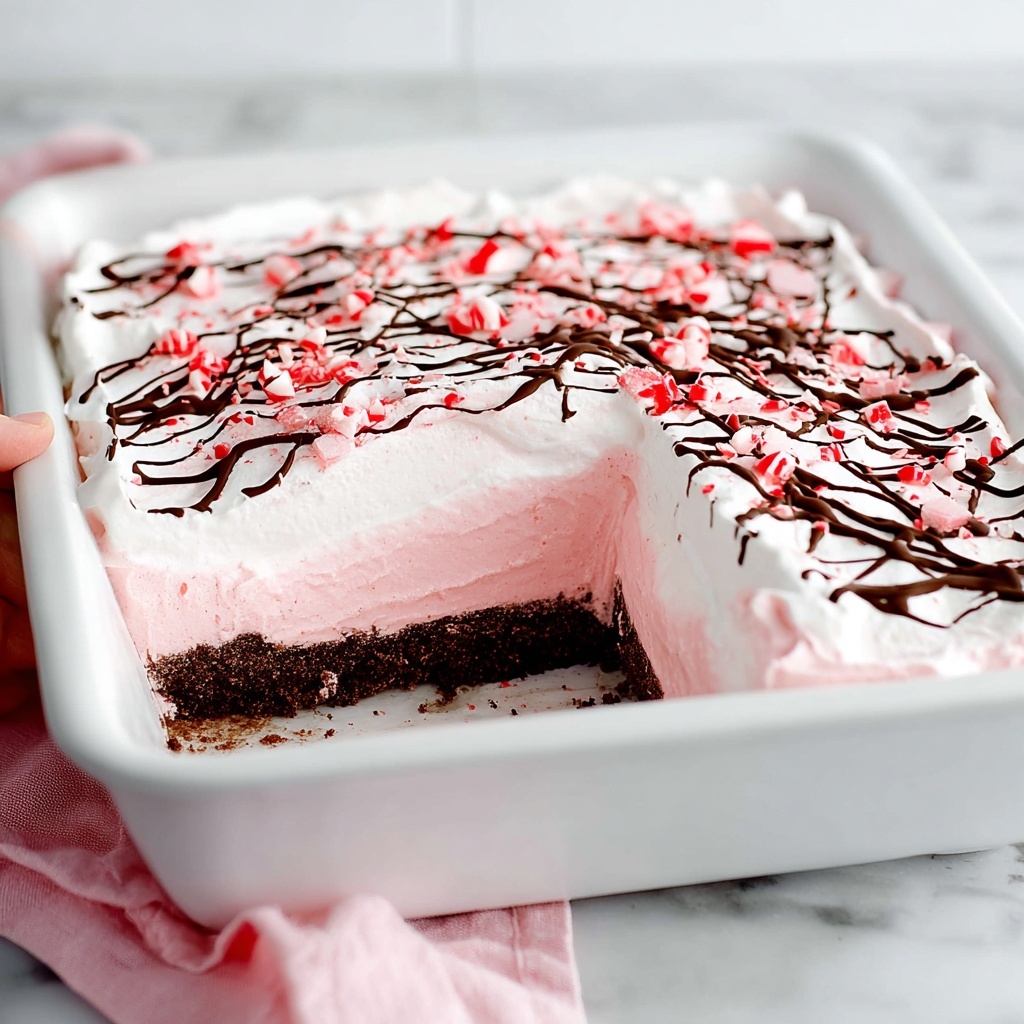
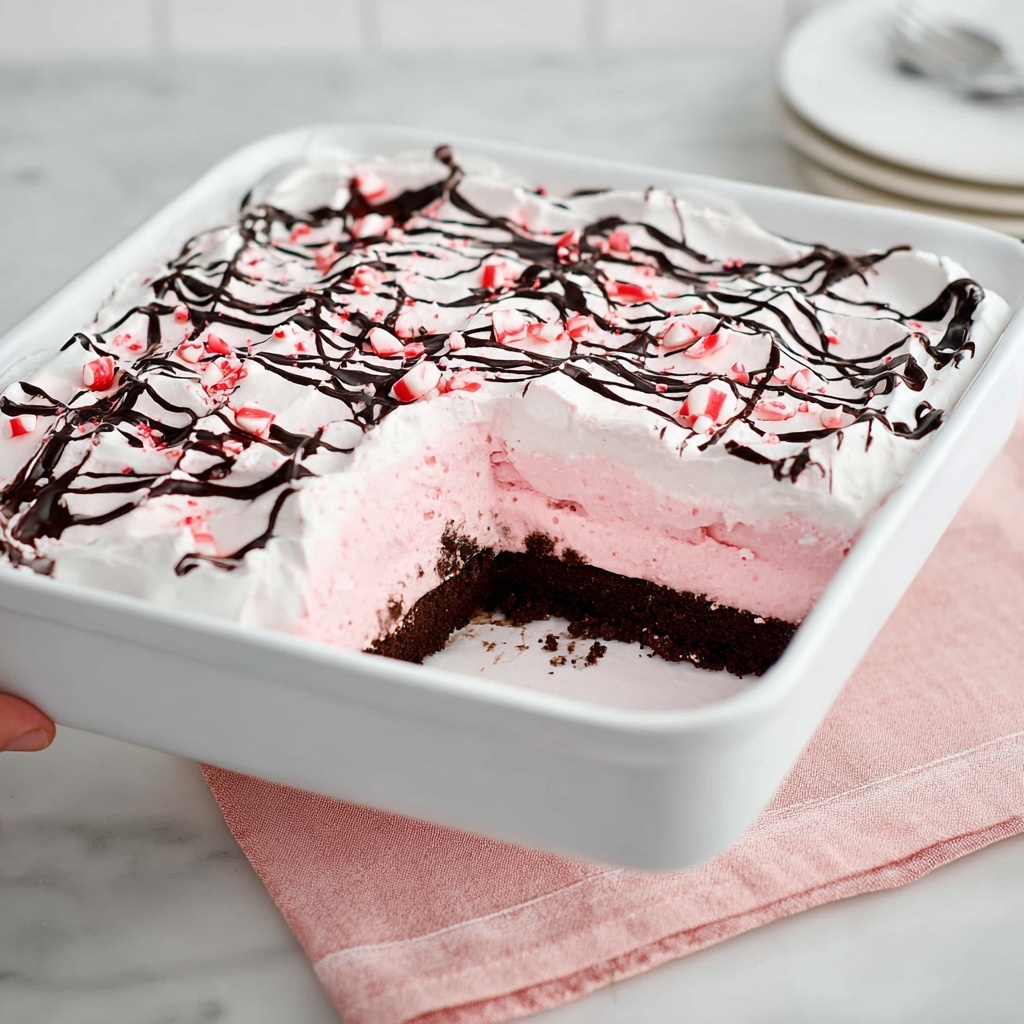
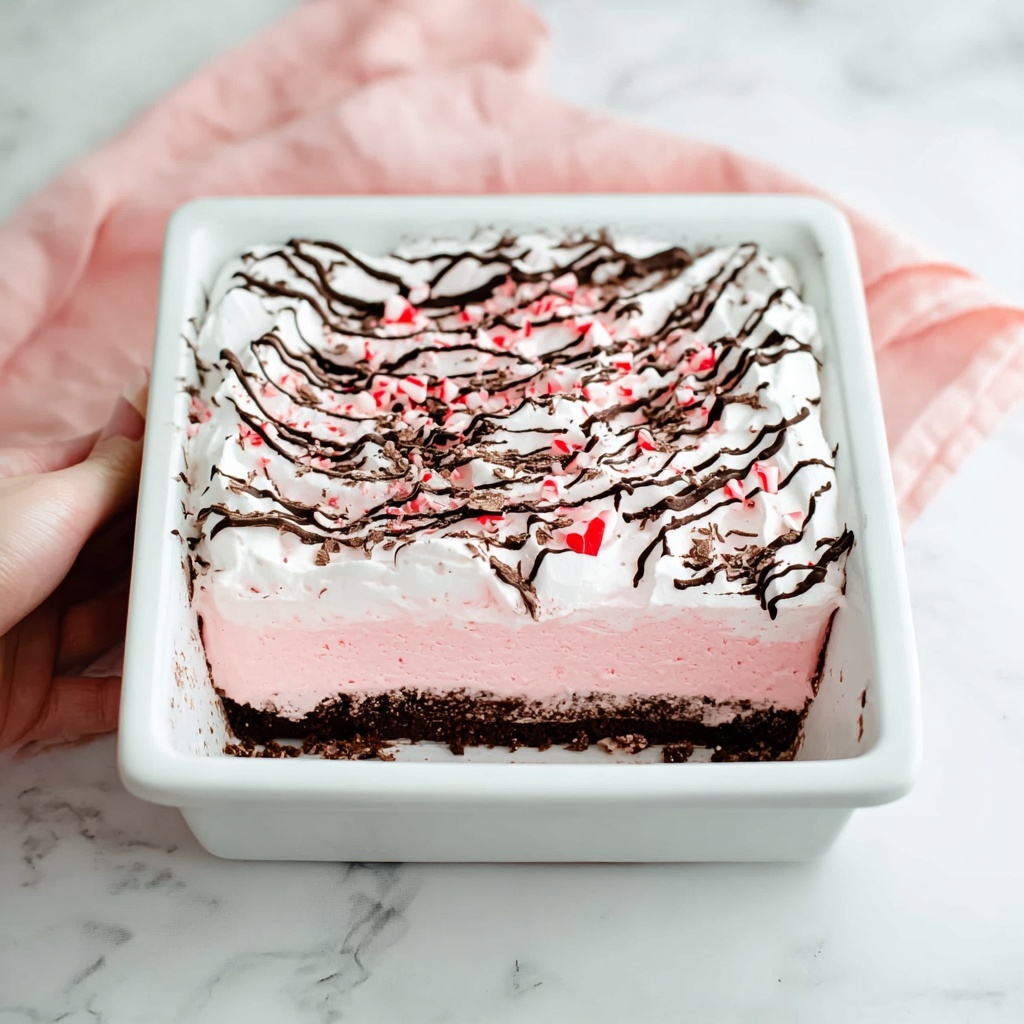
If you’re looking for a refreshingly festive treat that’s as delightful to make as it is to eat, then this Easy Peppermint Ice Cream Cake Recipe is going to be your new best friend. Imagine layers of creamy peppermint-flavored ice cream, crunchy Oreo cookie crust, fluffy Cool Whip topping, and a drizzle of rich hot fudge, all coming together in one spectacular cake that screams holiday cheer or just a fun indulgence on any day. It’s a no-bake dessert that requires minimal effort but serves up maximum wow factor and taste. Whether you’re serving it to guests or sneaking a slice for yourself, this cake is irresistible.
Ingredients You’ll Need
Preparing this Easy Peppermint Ice Cream Cake Recipe couldn’t be simpler, thanks to an ingredient list that checks all the boxes for flavor and texture. Each component plays a special role—from the crunchy Oreo base bringing structure and chocolate kick, to the peppermint ice cream that provides a creamy, minty freshness that lifts the whole dessert.
- Oreo cookies (14 oz): The classic chocolate sandwich cookies crushed to create a crumbly and flavorful crust that holds everything together beautifully.
- Unsalted butter (6 Tbsp, melted): Helps bind the cookie crumbs into a firm and delicious base with that perfect buttery taste.
- Peppermint or vanilla ice cream (1 Gallon): The star ingredient that gives this cake its creamy consistency and festive mint flavor; vanilla works beautifully with added peppermint extract and food coloring.
- Pink gel food coloring: Used only if you opt for vanilla ice cream to give your cake a charming holiday glow.
- Peppermint extract (2 tsp): A concentrated burst of mint flavor to infuse homemade peppermint flair into vanilla ice cream.
- Candy canes (6 medium-sized, crushed): Adds a delightful crunch and festive look when sprinkled over the top.
- Cool Whip (8 oz): For that light, fluffy layer on top that balances the rich ice cream below.
- Nonstick spray: Keeps the cake from sticking to the pan, making unmolding a breeze.
- Hot fudge or chocolate sauce: Drizzled over the Cool Whip, it adds a decadent chocolate surprise and visually appealing finish.
- 9″ x 9″ freezer-safe pan: Essential for shaping and freezing your masterpiece with ease.
How to Make Easy Peppermint Ice Cream Cake Recipe
Step 1: Soften and Flavor the Ice Cream
Begin by taking your ice cream out of the freezer to soften just enough to stir easily—it should have a semi-liquid texture so it spreads smoothly. If you’re using vanilla ice cream, now’s when you stir in peppermint extract and a few drops of pink gel food coloring to infuse that festive minty flavor and pretty pastel tint.
Step 2: Crush the Oreos
Place the Oreo cookies into a sealed gallon zipper bag, then crush them with a rolling pin until you have medium-to-fine crumbs. If you prefer, you can blitz them in a food processor for even faster results. The texture here is key—it should be crumbly, not powdery, to ensure the crust has a nice bite.
Step 3: Mix Crumbs with Melted Butter
Pour the crushed Oreos into a bowl and add the melted butter. Use your hands or a spoon to combine until the crumbs are evenly coated and slightly clump together—this buttery mixture will hold the base firm once pressed in the pan.
Step 4: Prepare Your Pan and Press the Crust
Spray your 9” x 9” freezer-safe pan thoroughly with nonstick spray, making sure to cover the base and sides. Then press the cookie mixture firmly into the bottom to form an even, compact crust. This sets the foundation for the entire cake.
Step 5: Layer the Ice Cream
Pour your softened peppermint ice cream evenly over the chilled cookie crust. Use a silicone spatula to spread it smoothly, creating an even top layer. This will freeze into the creamy heart of your cake.
Step 6: Freeze Until Solid
Place the pan into the freezer and let it harden for at least 4 hours. This step is crucial so the ice cream firms back up and holds its shape for the finishing touches.
Step 7: Add the Cool Whip and Chocolate Sauce
Once the ice cream layer is firm, spread the Cool Whip evenly over the top using a spatula for a plush, snowy finishing layer. Next, drizzle hot fudge or chocolate sauce over the Cool Whip in alternating vertical and horizontal lines. Use a toothpick to drag through the sauce creating a pretty, swirled pattern that makes the cake extra special.
Step 8: Sprinkle Crushed Candy Canes and Final Freeze
Sprinkle the crushed candy canes generously over the decorated top. Return the cake to the freezer for at least one hour to firm up the Cool Whip layer so your cake slices perfectly when served.
Step 9: Serve and Enjoy!
Before serving, let the cake sit at room temperature for about 10 to 15 minutes to soften slightly for easier slicing. Use a knife dipped in hot water for clean, smooth cuts. Now dig in and enjoy the perfect blend of cool, creamy, and crunchy textures in every bite!
How to Serve Easy Peppermint Ice Cream Cake Recipe
Garnishes
Feel free to get creative with your garnishes to elevate this cake from simple to stunning. Fresh peppermint leaves, extra crushed candy canes, or even a few chocolate shavings can add flair and enhance the peppermint-chocolate flavor symphony.
Side Dishes
This minty ice cream cake pairs beautifully with light sides like fresh fruit salad, raspberry sauce, or even a cup of hot cocoa or coffee to balance out the cold, creamy sweetness with a cozy warm drink.
Creative Ways to Present
Presentation can be as fun as the recipe itself! Serve slices on chilled plates with a drizzle of chocolate syrup or a dollop of whipped cream. For parties, consider individual portions in clear cups layered with crumbled cookies, ice cream cake chunks, and candy cane sprinkles for an easy grab-and-go version.
Make Ahead and Storage
Storing Leftovers
Leftover slices of this Easy Peppermint Ice Cream Cake Recipe should be covered tightly with plastic wrap or stored in an airtight container to prevent freezer burn and odor absorption. They’ll stay fresh in the freezer for up to 2 weeks.
Freezing
If you want to prepare the cake in advance, you can complete the entire recipe up to the final freeze step. Freeze the cake well-wrapped for up to one month. When ready to enjoy, just thaw it slightly before serving for the best texture and flavor.
Reheating
No reheating required here—this is a chill-only dessert! Just let it sit at room temperature for about 10-15 minutes before slicing to make cutting easier and keep the cake’s textures enjoyable.
FAQs
Can I use another type of cookie for the crust instead of Oreos?
Absolutely! While Oreos provide a perfect chocolate crunch, you can try other sandwich cookies, chocolate wafers, or even ginger snaps for a spicy twist. Just make sure to crush them finely and mix with melted butter to form a solid crust.
Is it necessary to use peppermint extract if I use peppermint ice cream?
Nope! Peppermint ice cream already has that minty flavor built-in. The extract is mainly for when you want to use vanilla ice cream and add your own peppermint kick. Adjust strength to your liking.
Can I make this cake in a different pan size?
Yes, but keep in mind that cooking times and layer thickness may vary. A 9” x 9” pan is ideal for even freezing and portion size. Larger or smaller pans might require adjustments in the amount of ingredients and freezing time.
How long should I let the ice cream soften before mixing?
About 10-15 minutes at room temperature usually works well. You want it soft enough to stir and spread easily but not melted liquid. Achieving that perfect semi-liquid consistency helps the cake set beautifully.
Can I add extra toppings like nuts or chocolate chips?
Definitely! Mix-ins like chopped nuts, mini chocolate chips, or even festive sprinkles can add extra texture and flavor. Just sprinkle them between the ice cream and Cool Whip layers for a delightful surprise.
Final Thoughts
I cannot recommend this Easy Peppermint Ice Cream Cake Recipe enough for anyone craving a cool, creamy, and joyfully festive dessert packed with flavor and texture. It’s a fantastic make-ahead treat that always impresses without the hassle of baking, and the peppermint twist makes it especially perfect for holiday celebrations or any time you want a refreshing indulgence. So go ahead, gather your ingredients, and whip up a slice of happiness that everyone will love!
Print
Easy Peppermint Ice Cream Cake Recipe
- Prep Time: 15 minutes
- Cook Time: 0 minutes
- Total Time: 4 hours 15 minutes
- Yield: 10 servings
- Category: Dessert
- Method: No-Cook
- Cuisine: American
Description
This Easy Peppermint Ice Cream Cake combines the creamy, refreshing flavor of peppermint ice cream with a crunchy Oreo cookie crust and a light Cool Whip topping. Perfect for the holidays or any special occasion, this no-bake dessert is simple to assemble and delightfully festive with crushed candy cane accents and a chocolate drizzle.
Ingredients
Crust
- 14 oz Oreo cookies (or similar chocolate sandwich cookies)
- 6 Tbsp unsalted butter, melted
Ice Cream Layer
- 1 gallon peppermint or vanilla ice cream
- 2 tsp peppermint extract (only if using vanilla ice cream)
- Pink gel food coloring (optional, if using vanilla ice cream)
Topping
- 6 medium-sized candy canes, crushed
- 8 oz Cool Whip
- Hot fudge or chocolate sauce, for drizzling
- Nonstick spray, for pan
Equipment
- 9″ x 9″ freezer-safe pan
Instructions
- Soften the Ice Cream: Take the ice cream out of the freezer and allow it to soften until semi-liquid. Pour it into a mixing bowl and stir thoroughly to eliminate lumps and achieve uniform consistency.
- Add Flavoring (If Using Vanilla): If using vanilla ice cream, add peppermint extract and pink gel food coloring now. Stir well to combine.
- Crush Cookies: Place Oreo or chocolate sandwich cookies into a gallon-sized zipper bag. Use a rolling pin or food processor to crush into coarse to medium-fine crumbs.
- Mix Crumbs and Butter: Pour cookie crumbs into a bowl and mix in the melted butter by hand to evenly coat and bind the crumbs.
- Prepare Pan: Spray a 9″ x 9″ freezer-safe pan with nonstick spray, coating the base and sides thoroughly.
- Form Cookie Crust: Press the cookie crumb mixture evenly onto the bottom of the pan using your hands or the back of a spoon.
- Add Ice Cream Layer: Pour the softened ice cream over the crust and use a silicone spatula to smooth and even out the surface.
- Freeze Ice Cream: Place the pan in the freezer and chill for at least 4 hours until the ice cream is fully hardened.
- Spread Cool Whip: Remove the pan and evenly spread the Cool Whip over the hardened ice cream layer with a silicone spatula.
- Drizzle Chocolate Sauce: Drizzle hot fudge or chocolate sauce over the Cool Whip in vertical lines, then horizontal lines. Use a toothpick to swirl and create a decorative pattern.
- Add Candy Cane Topping: Sprinkle crushed candy canes evenly over the chocolate drizzle. Return the pan to the freezer for at least 1 hour to set.
- Serve: Remove the cake from the freezer and let it sit at room temperature for 10–15 minutes before slicing. Dip a knife in hot water to make clean slices. Serve and enjoy your festive peppermint ice cream cake!
Notes
- Use peppermint ice cream to skip the addition of peppermint extract and pink coloring.
- Adjust peppermint extract amount to taste depending on preference for stronger or milder mint flavor.
- Press cookie crumb crust firmly to create a solid base for the ice cream.
- Let the cake sit at room temperature briefly before slicing to ensure clean cuts.
- Warm the knife in hot water and wipe between cuts to prevent sticking.
- For a firmer crust, chill the cookie crumb mixture before adding ice cream.
- Use a freezer-safe pan to avoid cracking or damage when freezing.
- Store leftovers covered in the freezer to maintain freshness.


