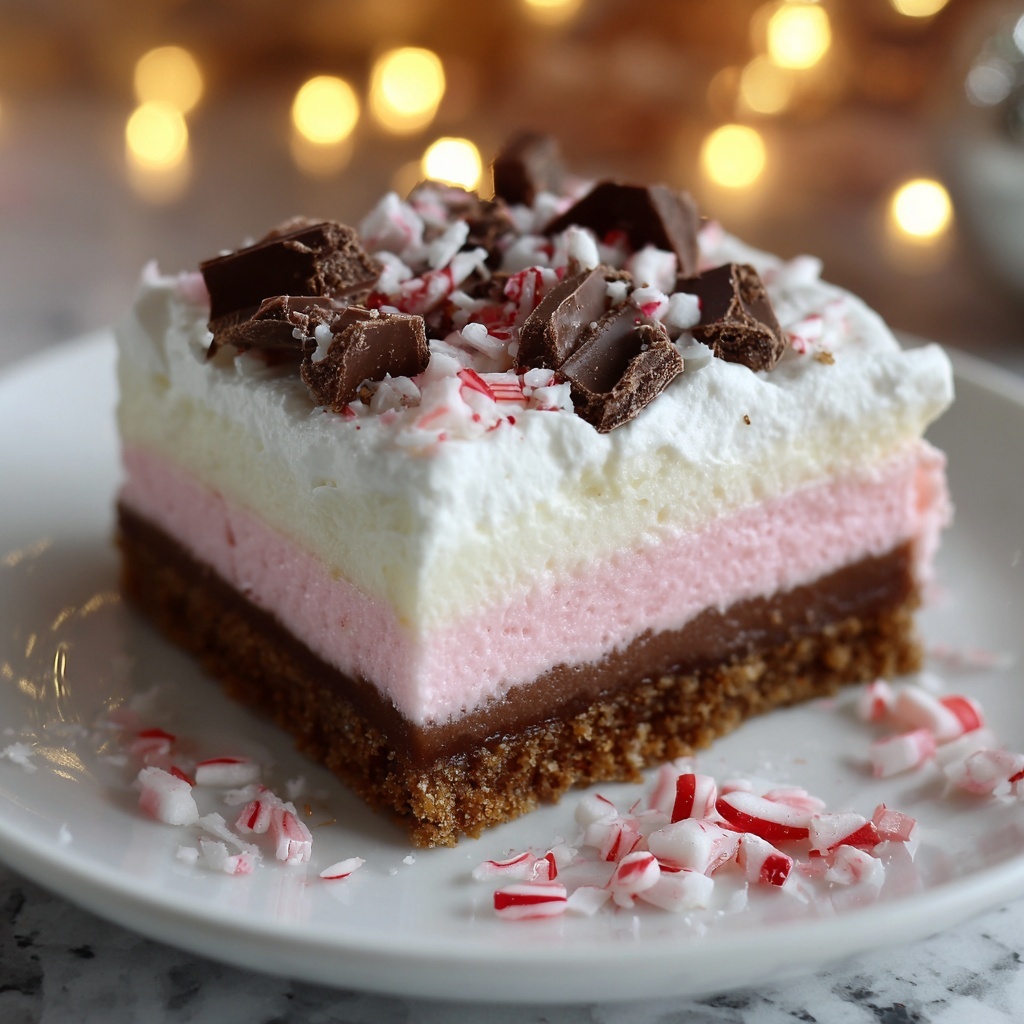
If you are searching for a festive and irresistible treat to wow your friends and family, look no further than the Decadent Layers of Chocolate and Peppermint Bliss Recipe. This delightful dessert perfectly balances rich, fudgy chocolate brownie, a silky peppermint cream, and a luscious chocolate ganache topping, creating an enchanting trio of flavors and textures. Every bite feels like a celebration of holiday cheer, making it an unforgettable indulgence that satisfies chocolate lovers and peppermint fans alike.
Ingredients You’ll Need
The magic behind this Decadent Layers of Chocolate and Peppermint Bliss Recipe starts with simple, quality ingredients that build layers of flavor and texture. Each component brings something special — from the buttery richness and deep cocoa notes of the brownie base, to the refreshing peppermint cream that adds a cool brightness, and finally the glossy chocolate ganache that provides a smooth, decadent finish.
- Unsalted butter, melted (1 cup): Provides a rich, creamy base essential for the fudgy brownie texture.
- Granulated sugar (1½ cups): Sweetens the brownie with classic caramel notes when baked.
- Brown sugar (1 cup): Adds moisture and depth of flavor, enhancing the chewiness of the brownie.
- Large eggs (4): Bind ingredients while adding protein for structure and firmness.
- Vanilla extract (1 teaspoon): Boosts overall flavor with warm, sweet undertones.
- All-purpose flour (1 cup): The body for the brownies, providing just the right firmness.
- Unsweetened cocoa powder (1 cup): Infuses intense chocolate flavor into the base.
- Salt (½ teaspoon): Balances sweetness and enhances all flavors.
- Powdered sugar (1½ cups): Creates a silky peppermint cream with smooth sweetness.
- Unsalted butter, softened (3 tablespoons): Adds creaminess to the peppermint layer.
- Heavy cream (3 tablespoons for cream + ¾ cup for ganache): Ensures a rich and velvety texture in both layers.
- Peppermint extract (½ teaspoon): Delivers that unmistakable refreshing mint flavor.
- Optional red or pink food coloring: Adds festive color to the peppermint cream layer.
- Semi-sweet or dark chocolate, chopped (6 ounces): Melts into the ganache, providing the perfect bittersweet topping.
- Butter (1 tablespoon for ganache): Adds sheen and extra richness to the chocolate ganache.
- Crushed peppermint candies or candy canes: A crunchy, cheerful garnish to finish off the dessert.
How to Make Decadent Layers of Chocolate and Peppermint Bliss Recipe
Step 1: Prepare the Brownie Base
Start by preheating your oven to 350°F and lining a 9×13-inch baking pan with parchment paper, leaving enough overhang to lift the brownies out effortlessly later. In a large bowl, whisk together the melted butter, granulated sugar, and brown sugar until combined. Beat in the eggs and vanilla extract until the mixture is smooth and slightly glossy. Next, sift in the flour, cocoa powder, and salt to ensure no lumps disrupt the batter. Stir everything gently until just combined so you maintain the fudgy texture of the brownies. Pour the batter evenly into the pan and bake for 25 to 28 minutes. When a toothpick inserted comes out with a few moist crumbs, your brownies are perfectly fudgy and ready. Let the base cool completely before moving to the next layer.
Step 2: Create the Peppermint Cream Layer
While the brownie base cools, whisk together powdered sugar, softened butter, heavy cream, and peppermint extract until your mixture transforms into a fluffy, smooth peppermint cream. If you want to add a festive touch, mix in a few drops of red or pink food coloring to give the layer a holiday glow. Spread this dreamy peppermint frosting evenly over the cooled brownie base using an offset spatula or the back of a spoon. Pop the pan in the refrigerator for 20 to 30 minutes so that the cream layer firms up nicely before adding the ganache.
Step 3: Prepare and Pour the Chocolate Ganache
Heat the heavy cream in a small saucepan over medium heat just until it begins to simmer; avoid boiling. Remove it from the heat, then stir in the chopped chocolate and butter, stirring continuously until you achieve a smooth, glossy ganache. Allow the ganache to cool slightly so it thickens but remains pourable. Pour this beautiful chocolate layer over the peppermint cream, smoothing the top carefully for an even finish. Before chilling, sprinkle crushed peppermint candies or candy canes generously over the ganache to add color, texture, and extra peppermint punch. Refrigerate the entire dessert for at least one hour to let all layers set perfectly.
How to Serve Decadent Layers of Chocolate and Peppermint Bliss Recipe
Garnishes
For an extra splash of festivity, crushed peppermint candies on top create a delightful crunch and visual pop. You can also add a light dusting of cocoa powder or edible glitter to elevate the presentation. Thin chocolate curls or shards placed artfully add a touch of elegance, making this dessert a showstopper.
Side Dishes
This treat pairs beautifully with a dollop of freshly whipped cream or a scoop of vanilla bean ice cream to balance the richness and refresh the palate. For a warming companion, consider serving it alongside a mug of hot cocoa or peppermint tea, which echoes the dessert’s flavors harmoniously.
Creative Ways to Present
For a party or gift, cut the bars into small bite-sized squares and arrange them on a festive platter with sprigs of fresh mint or holly for a holiday vibe. Alternatively, stack a few bars and tie them with a red ribbon for a beautiful, edible gift. If you want to impress, serve individual portions in clear glass cups to showcase the luscious layers of chocolate and peppermint bliss.
Make Ahead and Storage
Storing Leftovers
Thanks to the sturdy layers, this dessert keeps wonderfully in the refrigerator for up to five days. Make sure to store it in an airtight container or cover tightly with plastic wrap to maintain freshness and prevent any odors from seeping in.
Freezing
These bars freeze well if you want to prepare ahead for holiday gatherings or special occasions. Wrap individual bars in plastic wrap and place them in an airtight freezer bag. Freeze up to 2 months. To thaw, simply move them to the refrigerator overnight before serving.
Reheating
This dessert is best enjoyed chilled or at room temperature, so reheating is generally not recommended. However, if you prefer slightly softened chocolate, let bars sit at room temperature for 15 to 20 minutes before biting in. Avoid microwaving as it may melt the ganache unevenly and alter the peppermint cream texture.
FAQs
Can I use dark chocolate instead of semi-sweet for the ganache?
Absolutely! Dark chocolate will lend a slightly more bitter, richer flavor to the ganache, which pairs beautifully with the sweet peppermint cream and fudgy brownie base.
Is there a substitute for peppermint extract?
If you’re not a fan of peppermint extract, you can try using mint extract but reduce the amount, as it tends to be stronger. Alternatively, peppermint oil drops designed for culinary use work wonderfully—just use sparingly.
Can I make this recipe gluten-free?
Yes! Swap out the all-purpose flour for a gluten-free flour blend that measures 1-to-1. Make sure the blend includes xanthan gum or similar binding agents to keep the brownie’s texture intact.
How do I get clean slices when cutting these bars?
The key is to use a warm knife. Dip your knife in hot water and wipe it dry before each cut; this prevents the layers from sticking and keeps your bars looking neat and professional.
Can I make this dessert vegan?
It’s a bit tricky since butter, eggs, and heavy cream are essential here, but you could try plant-based alternatives like vegan butter, flax eggs, and coconut cream. Just be prepared for slight differences in texture and flavor.
Final Thoughts
This Decadent Layers of Chocolate and Peppermint Bliss Recipe is truly a celebration in every bite. From the rich fudgy base to the cool peppermint cream and the silky ganache topping, it delivers layers of flavor and festive cheer that will have everyone asking for seconds. Whether you’re baking for a special occasion or just to satisfy your sweet tooth, this recipe is sure to become a treasured favorite. Give it a try and spread the joy of chocolate and peppermint bliss!
Print
Decadent Layers of Chocolate and Peppermint Bliss Recipe
- Prep Time: 30 minutes
- Cook Time: 30 minutes
- Total Time: 2 hours
- Yield: 24 bars
- Category: Dessert
- Method: Baking
- Cuisine: American
- Diet: Vegetarian
Description
Indulge in these Decadent Layers of Chocolate and Peppermint Bliss, featuring a rich, fudgy brownie base topped with a creamy peppermint layer and finished with a smooth chocolate ganache. Perfect for holiday celebrations or any time you crave a festive, chocolate-mint treat.
Ingredients
For the brownie base:
- 1 cup unsalted butter, melted
- 1½ cups granulated sugar
- 1 cup brown sugar
- 4 large eggs
- 1 teaspoon vanilla extract
- 1 cup all-purpose flour
- 1 cup unsweetened cocoa powder
- ½ teaspoon salt
For the peppermint cream layer:
- 1½ cups powdered sugar
- 3 tablespoons unsalted butter, softened
- 2 tablespoons heavy cream
- ½ teaspoon peppermint extract
- optional: a few drops of red or pink food coloring
For the chocolate ganache topping:
- ¾ cup heavy cream
- 6 ounces semi-sweet or dark chocolate, chopped
- 1 tablespoon butter
For garnish:
- Crushed peppermint candies or candy canes
Instructions
- Prepare the brownie base: Preheat the oven to 350°F (175°C) and line a 9×13-inch baking pan with parchment paper, leaving an overhang for easy removal. In a large bowl, whisk together the melted butter, granulated sugar, and brown sugar until combined. Beat in the eggs and vanilla extract until the mixture is smooth. Sift in the all-purpose flour, unsweetened cocoa powder, and salt, stirring gently until just combined to avoid overmixing. Pour the batter evenly into the prepared pan and bake for 25–28 minutes, or until a toothpick inserted in the center comes out with a few moist crumbs. Remove from the oven and let cool completely.
- Make the peppermint cream layer: In a clean bowl, beat powdered sugar, softened butter, heavy cream, and peppermint extract with an electric mixer until the mixture is smooth and fluffy. Add a few drops of red or pink food coloring if desired to give the layer a festive touch. Spread the peppermint cream evenly over the cooled brownie base. Place the pan in the refrigerator and chill for 20 to 30 minutes to firm up the layer.
- Prepare the chocolate ganache topping: In a small saucepan, gently heat the heavy cream just until it begins to simmer—do not boil. Remove from heat and immediately add the chopped semi-sweet or dark chocolate and butter. Stir continuously until the ganache is smooth, glossy, and fully melted. Allow it to cool slightly to thicken but still be pourable.
- Assemble and chill: Pour the slightly cooled ganache over the peppermint cream layer, smoothing the top with a spatula. Sprinkle crushed peppermint candies or candy canes over the ganache for garnish. Refrigerate the entire pan for about 1 hour or until the ganache is fully set.
- Serve: Once set, use the parchment paper overhang to lift the dessert from the pan. Slice into 24 bars using a warm knife, wiping the blade clean between cuts for neat slices. Serve chilled or allow to come to room temperature for a softer texture.
Notes
- For clean, professional-looking cuts, warm your knife under hot water, dry it, and then slice the bars, wiping the blade clean between each cut.
- These bars can be prepared up to a day in advance and stored in the refrigerator for up to 5 days without losing flavor or texture.
- Adjust peppermint extract to taste if you prefer a stronger or milder mint flavor.
- If you prefer, you can substitute the all-purpose flour with a gluten-free flour blend to make the brownies gluten-free.
- Ensure the brownie base is fully cooled before adding the peppermint cream to prevent melting and mixing of layers.

