
If you’re craving a dessert that feels like a warm hug in every bite, this Classic Creamy Cheesecake Recipe is exactly what you need. It blends the smooth richness of cream cheese with a perfectly balanced sweet crust, resulting in a timeless treat that’s indulgent yet light. Whether you’re celebrating a special occasion or simply want to brighten your day, this cheesecake delivers that silky, melt-in-your-mouth texture that keeps everyone coming back for seconds.
Ingredients You’ll Need
With just a handful of simple ingredients, this recipe comes together beautifully, showing that classic desserts don’t need to be complicated. Each component plays a vital role in building the flavor, texture, and creamy finish that make this cheesecake so irresistible.
- Graham cracker crumbs (1 ½ cups): Forms the crispy, buttery base that adds the perfect crunch to every bite.
- Granulated sugar (¼ cup + 1 cup): Provides the essential sweetness for both crust and filling.
- Unsalted butter (6 tablespoons, melted): Binds the crust ingredients and adds a rich, golden flavor.
- Cream cheese (4 packages, 8 oz each, softened): The star ingredient delivering that classic creamy texture and tangy flavor.
- Pure vanilla extract (1 teaspoon): A subtle yet vital note that complements and deepens the overall taste.
- Large eggs (4, room temperature): Provide structure and richness while keeping the filling silky smooth.
- Sour cream (⅔ cup): Adds a gentle tang and contributes to a velvety texture.
- Heavy cream (⅔ cup): Elevates the creaminess and creates that luscious mouthfeel everyone loves.
How to Make Classic Creamy Cheesecake Recipe
Step 1: Prepare the Crust
Preheat your oven to 325°F (160°C) and wrap the bottom of a 9-inch springform pan with foil to prevent leaks. In a medium bowl, mix together the graham cracker crumbs, ¼ cup sugar, and melted butter until the mixture resembles wet sand. Press this mixture firmly into the bottom of your pan to create a sturdy base. Bake it for 10 minutes to set the crust and bring out that lovely buttery aroma. Once done, pull it out and let it cool while you prepare the filling.
Step 2: Make the Cheesecake Filling
Now comes the fun part where your cheesecake truly starts to shine. Using a hand mixer, beat the softened cream cheese on medium speed for about 2 to 3 minutes until it’s completely smooth and fluffy—this prevents lumps and ensures the perfect texture. Add in the 1 cup of sugar and vanilla extract, and continue beating until everything is well combined. Next, add the eggs one at a time, mixing on low speed after each addition to keep the batter silky. Finish by blending in the sour cream and heavy cream, beating just until smooth. Trust me, this step is key for achieving that melt-in-your-mouth creaminess.
Step 3: Assemble and Bake
Pour this luscious filling over your cooled crust in the springform pan, smoothing the top gently. Set the pan inside a larger roasting pan and carefully pour hot water into the roasting pan until it reaches halfway up the sides of the springform pan—this water bath helps the cheesecake bake evenly without cracking. Bake for about 1 hour and 10 minutes or until the edges are set but the center still jiggles slightly when nudged. This delicate balance means you’ll end up with a creamy center that’s not overcooked.
Step 4: Cool and Chill
Once baking is done, turn off the oven and slightly crack the door open. Let the cheesecake cool slowly in the oven for one hour, which helps prevent sudden temperature changes that can cause cracks. Afterward, remove it carefully from the water bath, run a knife around the edges to loosen it from the pan, and allow it to reach room temperature. For the best results, refrigerate the cheesecake for at least 4 hours or overnight — this step allows the flavors to deepen and the texture to fully set into that classic creamy perfection.
Step 5: Serve
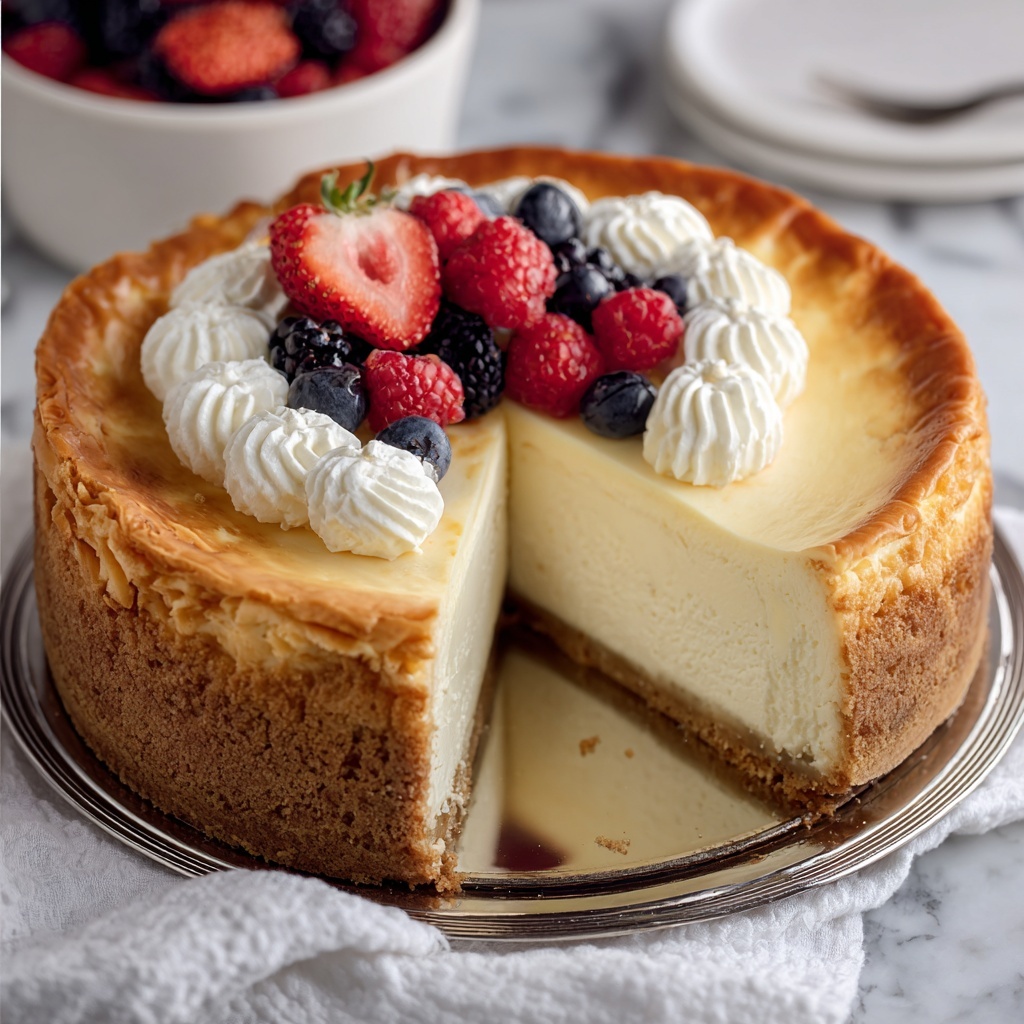
Remove the sides of the springform pan, slice your cheesecake with a sharp knife, and get creative with toppings. Whether you prefer fresh berries, a drizzle of chocolate sauce, or a dollop of whipped cream, this cheesecake is the perfect canvas for whatever you love.
How to Serve Classic Creamy Cheesecake Recipe

Garnishes
One of the joys of this Classic Creamy Cheesecake Recipe is how beautifully it pairs with a variety of garnishes. Fresh berries like strawberries, raspberries, or blueberries add a bright contrast to the richness, while a sprinkle of lemon zest can offer a lively hint of citrus. For chocolate lovers, a drizzle of ganache or chocolate chips scattered on top creates an indulgent finish. Don’t forget a sprig of mint to brighten each bite visually and aromatically.
Side Dishes
Although cheesecake is a star on its own, pairing it with light accompaniments allows its flavors to pop. Consider serving alongside a scoop of vanilla ice cream for an extra creamy experience or a small bowl of mixed fruit salad that balances sweetness with freshness. A cup of strong coffee or a glass of dessert wine can also elevate your cheesecake moment into a full-on celebration.
Creative Ways to Present
Presentation is half the fun! Use decorative plates and garnish with edible flowers for a gorgeous, elegant touch. For casual gatherings, serving your Classic Creamy Cheesecake Recipe as mini cheesecakes in ramekins is a crowd-pleaser and makes portioning a breeze. Layering cheesecake with fruit compote in a clear glass can also turn it into an inviting parfait, showing off the creamy layers and vibrant colors beautifully.
Make Ahead and Storage
Storing Leftovers
After enjoying your cheesecake, wrap any leftovers tightly with plastic wrap or store them in an airtight container to keep the moisture locked in. Refrigerating leftover cheesecake will keep it fresh for up to 5 days, maintaining that signature creaminess you love.
Freezing
If you want to save some for later indulgence, freezing your cheesecake is a great option. Be sure to slice it before freezing and wrap each piece individually in plastic wrap, then place in a freezer-safe container or bag. It can be stored for up to 2 months without losing flavor or texture, allowing you to enjoy your Classic Creamy Cheesecake Recipe anytime you crave a special treat.
Reheating
Reheating cheesecake is generally not recommended as it’s best enjoyed chilled; however, if you prefer it slightly softened, leave it at room temperature for 20 to 30 minutes before serving. This allows the flavors to open up without sacrificing the creamy texture.
FAQs
Can I use regular cream cheese instead of softened?
It’s important to use softened cream cheese for this recipe because it blends smoothly with the other ingredients. Cold cream cheese could create lumps and a less creamy texture in your cheesecake.
Why do you bake cheesecake in a water bath?
The water bath helps regulate the oven’s temperature around the cheesecake, promoting even cooking and preventing the edges from drying out or cracking. It’s a classic technique that ensures the perfect creamy consistency.
Can I substitute sour cream with Greek yogurt?
Yes, plain Greek yogurt can be used as a substitute for sour cream to maintain the tanginess, but it might slightly change the texture to be a bit less rich. Use full-fat Greek yogurt for best results.
How do I prevent cracks on my cheesecake?
Gentle mixing, baking in a water bath, and gradual cooling are your best allies in preventing cracks. Avoid over-beating the eggs and let the cheesecake cool slowly in the turned-off oven before chilling.
Can I make this cheesecake gluten-free?
Absolutely! Simply swap the graham cracker crumbs for a gluten-free alternative or crushed gluten-free cookies; the rest of the recipe remains the same and just as delicious.
Final Thoughts
There’s nothing quite like the satisfaction of slicing into a homemade cheesecake that’s rich, creamy, and perfectly balanced. This Classic Creamy Cheesecake Recipe has all the warmth and comfort of a beloved dessert that’s easy to make but always impressive. Give it a try for your next gathering or a weekend treat—you deserve it!
Print
Classic Creamy Cheesecake Recipe
- Prep Time: 20 minutes
- Cook Time: 1 hour 20 minutes
- Total Time: 5 hours 20 minutes
- Yield: 12 servings
- Category: Dessert
- Method: Baking
- Cuisine: American
Description
Classic Creamy Cheesecake with a buttery graham cracker crust and a smooth, rich cream cheese filling baked in a water bath to ensure a silky texture. Perfectly balanced sweetness and vanilla flavor make this an irresistible dessert for any occasion.
Ingredients
Crust
- 1 ½ cups graham cracker crumbs (about 10 crackers)
- ¼ cup granulated sugar
- 6 tablespoons unsalted butter, melted
Filling
- 4 (8 oz) packages cream cheese, softened
- 1 cup granulated sugar
- 1 teaspoon pure vanilla extract
- 4 large eggs, room temperature
- ⅔ cup sour cream
- ⅔ cup heavy cream
Instructions
- Prepare the Crust: Preheat the oven to 325°F (160°C). Wrap the bottom of a 9-inch springform pan with foil to prevent leaks. In a medium bowl, combine the graham cracker crumbs, sugar, and melted butter. Press this mixture firmly into the bottom of the prepared pan to form an even crust. Bake for 10 minutes, then remove and set aside to cool.
- Make the Cheesecake Filling: Using a hand mixer, beat the softened cream cheese until smooth and creamy, about 2 to 3 minutes. Gradually add the sugar and vanilla extract, continuing to beat until well combined. Add the eggs one at a time, mixing on low speed after each to avoid incorporating too much air. Finally, add the sour cream and heavy cream, beating just until the mixture is smooth and uniform.
- Assemble and Bake: Pour the cheesecake filling evenly over the cooled crust in the springform pan. Place the pan into a larger roasting pan. Pour hot water into the roasting pan until it comes halfway up the sides of the springform pan, creating a water bath which helps to bake the cheesecake evenly and prevents cracking. Bake in the preheated oven for 1 hour and 10 minutes, or until the edges are set but the center still jiggles slightly.
- Cool and Chill: Turn off the oven and crack the door open; let the cheesecake cool inside the oven for 1 hour. Remove the springform pan from the water bath and oven. Run a knife around the edges to loosen the cheesecake from the pan. Allow it to cool to room temperature on a wire rack before refrigerating for at least 4 hours or overnight to set completely.
- Serve: Carefully remove the sides of the springform pan. Slice the cheesecake with a clean knife. Serve plain or topped with your favorite additions such as fresh berries, whipped cream, or chocolate sauce for a delicious finish.
Notes
- Using room temperature eggs helps achieve a smoother filling without lumps.
- Wrapping the springform pan with foil prevents water from seeping into the crust during baking.
- Baking the cheesecake in a water bath helps prevent cracking by regulating the temperature and moisture.
- Allowing the cheesecake to chill overnight improves firmness and flavor.
- For easier slicing, warm the knife under hot water and wipe between cuts.


