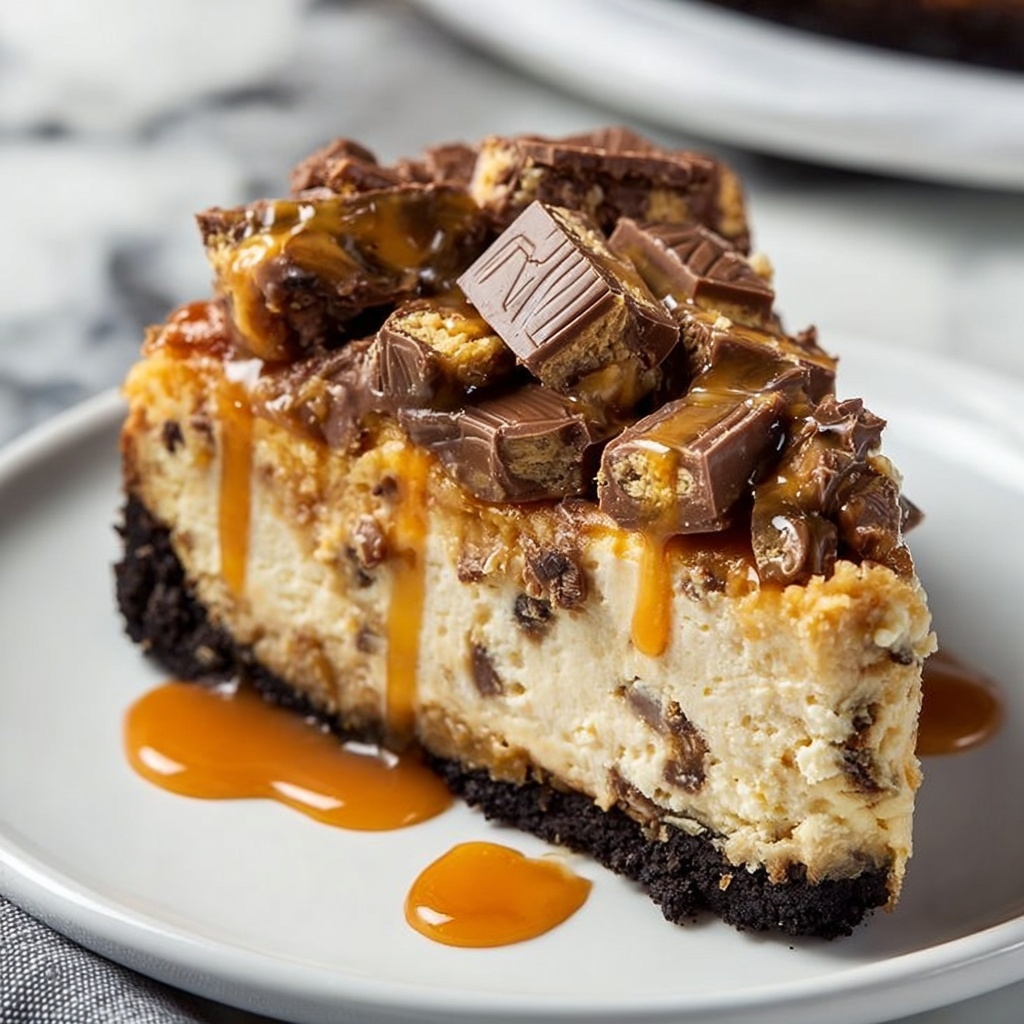
If you are on the hunt for a dessert that perfectly marries creamy richness with the irresistible crunch of candy bars, the Butterfinger Cheesecake Recipe is your new best friend. This indulgent treat combines a luscious cream cheese filling studded with chopped Butterfinger candy bars on a crisp graham cracker crust. Every bite offers a dreamy balance of smooth texture and sweet peanut buttery bursts that will have you coming back for more. Whether it’s a special occasion or a weekend indulgence, this cheesecake will quickly become a centerpiece everyone raves about.

Ingredients You’ll Need
The beauty of this Butterfinger Cheesecake Recipe lies in its straightforward ingredients, each playing a vital role in crafting the perfect taste and texture. From the buttery crust to the creamy filling and crunchy candy bits, every component is essential and easy to find.
- Graham cracker crumbs: Provides a crisp, slightly sweet base that holds the cheesecake together beautifully.
- Granulated sugar: Sweetens both the crust and the filling just right without overpowering.
- Unsalted butter (melted): Binds the crust ingredients and adds rich flavor.
- Cream cheese (softened): The star of the filling that gives the cheesecake its luscious, creamy body.
- Sour cream: Adds a touch of tanginess while keeping the texture silky smooth.
- Large eggs: Help set the filling with their gentle thickening power.
- Vanilla extract: Brings warmth and depth to the cheesecake flavor.
- Chopped Butterfinger candy bars: Introduces crispy, peanut buttery chunks that elevate every forkful.
- Whipped topping or whipped cream (optional): Adds a light, airy finish when serving.
How to Make Butterfinger Cheesecake Recipe
Step 1: Prepare the Crust
Preheat your oven to 325°F (160°C) and combine graham cracker crumbs, sugar, and melted butter in a bowl until the mixture feels like damp sand. Press this firmly into the bottom of a 9-inch springform pan to form an even crust. Bake for 10 minutes until set, then let it cool while you prepare the filling.
Step 2: Make the Cream Cheese Filling
In a large mixing bowl, beat the softened cream cheese and sugar together until silky smooth and creamy. Add the sour cream and vanilla extract, mixing thoroughly to blend all those rich flavors. Incorporate the eggs one at a time on low speed to avoid overmixing, which keeps the texture just right. Finally, fold in the chopped Butterfinger pieces gently so they’re evenly distributed without breaking them down too much.
Step 3: Bake the Cheesecake
Pour the luscious filling over the cooled crust and smooth the surface with a spatula. Bake for 50 to 60 minutes, watching for the center to remain slightly jiggly while the edges are set firm. Once done, turn off the oven, crack the door open, and allow the cheesecake to cool inside for an hour, preventing cracks and encouraging a smooth finish.
Step 4: Chill and Set
Transfer the cheesecake to the refrigerator to chill for at least 4 hours or overnight if possible. This resting time lets the flavors meld perfectly and ensures that creamy, firm texture that’s so satisfying.
How to Serve Butterfinger Cheesecake Recipe

Garnishes
Before presenting your masterpiece, spread a generous layer of whipped topping or fresh whipped cream on top for a delightful contrast of lightness. Sprinkle with extra chopped Butterfinger pieces to make each slice sparkle with candy bar crunch and a pop of color. This simple touch offers both elegance and an extra hint of indulgence.
Side Dishes
Pair your Butterfinger Cheesecake Recipe with fresh berries or a drizzle of caramel or chocolate sauce to complement the candy bar’s peanut buttery notes. Vanilla ice cream is another classic accompaniment that adds another creamy element without overshadowing the cheesecake’s rich texture.
Creative Ways to Present
For a crowd-pleaser, serve individual mini cheesecakes in muffin tins using the same recipe, topped with whole Butterfinger segments. Alternatively, create a layered parfait using chunks of cheesecake, whipped cream, and chopped Butterfinger candy for a fun, deconstructed spin that’s perfect for casual gatherings or kids’ parties.
Make Ahead and Storage
Storing Leftovers
Keep any leftover cheesecake covered tightly with plastic wrap or in an airtight container to prevent it from drying out. Stored in the refrigerator, it will stay fresh for up to 4 days, maintaining that creamy texture and candy crunch.
Freezing
This Butterfinger Cheesecake Recipe freezes beautifully. Wrap the cheesecake or individual slices in plastic wrap and aluminum foil before freezing. It can be kept for up to 2 months without compromising flavor or texture. Thaw overnight in the refrigerator before serving for the best results.
Reheating
Cheesecake is best enjoyed chilled, but if you prefer it slightly warmer, leave slices at room temperature for about 20 minutes before serving. Avoid microwaving as it can change the texture; gentle warming just enhances the flavors subtly.
FAQs
Can I use a different candy bar in this Butterfinger Cheesecake Recipe?
Absolutely! While Butterfinger adds a unique crispy peanut buttery crunch, you can substitute with similar candy bars like Heath or Butterfinger alternatives. Just be mindful of texture differences when chopping and folding them into the filling.
Do I need a springform pan to make this cheesecake?
Using a 9-inch springform pan is ideal because it allows for easy removal of the cheesecake without damaging the crust or edges. If you don’t have one, a regular cake pan lined with parchment paper might work, but releasing the cheesecake can be trickier.
Why is my cheesecake cracking on top?
Cracks often happen from overbaking or rapid cooling. Following the step where you turn off the oven and leave the cheesecake inside with the door slightly open helps prevent cracks and promotes an even texture on this Butterfinger Cheesecake Recipe.
Can I make this cheesecake gluten-free?
Yes! Swap the graham cracker crumbs for a gluten-free variety, and double-check the Butterfinger bars if you have a gluten sensitivity. The rest of the ingredients are naturally gluten-free, making this dessert adaptable for many diets.
Is it possible to make this cheesecake ahead of time?
Definitely. This Butterfinger Cheesecake Recipe actually tastes better after chilling overnight because the flavors deepen. You can prepare it 1 to 2 days in advance, making it perfect for holiday dinners or gatherings.
Final Thoughts
This Butterfinger Cheesecake Recipe is a delightful way to bring joy and sweetness to any table with its creamy texture and crunchy candy surprises. Its ease of preparation combined with incredible flavor makes it a fantastic dessert to share with friends and family. Trust me, once you try it, this cheesecake will be a beloved favorite you’ll want to make again and again.
Print
Butterfinger Cheesecake Recipe
- Prep Time: 20 minutes
- Cook Time: 60 minutes
- Total Time: 1 hour 20 minutes plus chilling
- Yield: 12 servings
- Category: Dessert
- Method: Baking
- Cuisine: American
- Diet: Vegetarian
Description
Indulge in this rich and creamy Butterfinger Cheesecake recipe featuring a buttery graham cracker crust, smooth cream cheese filling mixed with crunchy Butterfinger candy pieces, and an optional whipped topping for extra decadence. Perfect for any dessert craving, this American classic combines chocolate, peanut butter, and cheesecake in one delightful treat.
Ingredients
For the crust:
- 1 ½ cups graham cracker crumbs
- ¼ cup granulated sugar
- 6 tablespoons unsalted butter (melted)
For the filling:
- 3 packages (8 oz each) cream cheese (softened)
- 1 cup granulated sugar
- 1 cup sour cream
- 3 large eggs
- 1 teaspoon vanilla extract
- 1 ½ cups chopped Butterfinger candy bars
For the topping (optional):
- 1 cup whipped topping or whipped cream
- ½ cup chopped Butterfinger candy bars
Instructions
- Prepare the crust: Preheat your oven to 325°F (160°C). In a medium bowl, combine graham cracker crumbs, sugar, and melted butter until the mixture resembles wet sand. Press this mixture firmly into the bottom of a 9-inch springform pan. Bake for 10 minutes, then remove from oven and allow to cool.
- Make the filling: In a large mixing bowl, use an electric mixer to beat softened cream cheese and sugar until smooth and creamy. Add sour cream and vanilla extract, mixing well to combine. Add eggs one at a time, beating on low speed just until incorporated to avoid overmixing. Gently fold in the chopped Butterfinger pieces to distribute evenly throughout the batter.
- Assemble and bake: Pour the cream cheese filling over the cooled crust and smooth the surface. Bake in the preheated oven for 50 to 60 minutes, or until the center slightly jiggles when gently shaken but the edges are set. Turn off the oven, crack the door open, and let the cheesecake cool inside for 1 hour to prevent cracking.
- Chill the cheesecake: Transfer the cooled cheesecake to the refrigerator and chill for at least 4 hours or preferably overnight to allow it to fully set and develop flavor.
- Add topping and serve: Before serving, spread whipped topping or whipped cream evenly over the cheesecake and sprinkle with additional chopped Butterfinger candy bars for garnish and extra crunch.
Notes
- Using a water bath can help bake the cheesecake more evenly and reduce the chance of cracking.
- This cheesecake can be made 1–2 days in advance and kept refrigerated to maximize flavor.
- For clean, neat slices, dip your knife in hot water and wipe it clean between cuts.

