
If you have a sweet tooth and love a dessert that’s delightfully rich yet simple to pull together, then get ready to fall head over heels for this Brownie Refrigerator Cake Recipe. Imagine layers of fudgy brownie chunks mingling with creamy chocolate pudding and light whipped topping, all chilled to perfection—it’s the kind of no-bake magic that brings both nostalgia and wow factor to your dessert table. This cake is effortless to make, perfect for entertaining, and guaranteed to impress both family and friends with its luscious texture and deep chocolate flavor.

Ingredients You’ll Need
Every ingredient in this Brownie Refrigerator Cake Recipe plays a role, from providing the base’s rich fudginess to adding that creamy, dreamy finish. The beauty is in how simple they are, yet they come together to create a sensational dessert experience everyone will love.
- 1 box brownie mix (includes eggs and oil as per package instructions): The foundation of this cake, giving you moist, chocolaty brownies with minimal effort.
- 1 cup whipped topping: Adds fluffy lightness and a creamy contrast to the dense brownies.
- 2 cups chocolate pudding mix (instant): Provides smooth, rich chocolate flavor that binds the layers.
- 2 cups whole milk: Essential for the pudding mix to achieve that perfect silky texture.
- 1/2 cup crushed nuts (optional): Gives a delightful crunch and an extra layer of flavor for those who love texture in their desserts.
How to Make Brownie Refrigerator Cake Recipe
Step 1: Prepare and Bake the Brownies
Start by preheating your oven according to the brownie mix package instructions and greasing a 9×13-inch pan. Mix the batter as directed on the box, pour it into your prepared pan, and bake until a toothpick inserted in the center comes out clean. The brownies should have a beautiful fudgy texture when done. Make sure to let them cool completely before moving on to the next step—that cooling is crucial to prevent the whipped topping from melting later.
Step 2: Crumble the Brownies
Once the brownies have cooled down, crumble them into small pieces. The size is up to you—smaller crumbs will create a more uniform texture while slightly larger chunks will add a playful chewy surprise in every bite. This step is what sets your layers apart and builds the cake’s signature texture.
Step 3: Prepare the Chocolate Pudding
In a mixing bowl, whisk together the chocolate pudding mix and whole milk vigorously until the mixture thickens, which generally takes about 2 minutes. This step is quick but essential to ensure your pudding has that luscious, creamy consistency that elevates the cake.
Step 4: Assemble the Layers
Grab a serving dish and start layering your ingredients. Place half of the crumbled brownies evenly across the dish, then spread half of your whipped topping over them. Top that with half of the chocolate pudding mixture. Repeat these layers one more time to build a rich, inviting cake. If you love crunchy textures, sprinkle the optional crushed nuts between layers or on top for added dimension.
Step 5: Chill and Set
Cover the assembled cake and refrigerate it for at least four hours, but preferably overnight. This chilling time lets all the flavors meld together beautifully and allows the cake to firm up so it slices nicely. Patience here leads to a perfectly cohesive and indulgent dessert experience.
How to Serve Brownie Refrigerator Cake Recipe

Garnishes
To make your Brownie Refrigerator Cake Recipe extra special, consider garnishing with fresh berries like raspberries or strawberries for a burst of color and tartness. A light dusting of cocoa powder or a drizzle of chocolate sauce on top can also elevate the presentation and flavor, adding a touch of elegance with minimal effort.
Side Dishes
This dessert pairs wonderfully with a scoop of vanilla ice cream or a dollop of fresh whipped cream to complement its rich chocolate layers. If you want to balance the sweetness, serve alongside tart coffee or a freshly brewed espresso—these pairings create a harmonious dessert moment.
Creative Ways to Present
You can serve this cake in a decorative glass trifle bowl for a gorgeous layered look that shows off the contrasting textures. Alternatively, portion it into clear individual cups or jars for a delightful single-serving treat that’s perfect for parties or potlucks. Adding a sprinkle of edible gold flakes or colorful sprinkles can also make it feel festive and personalized.
Make Ahead and Storage
Storing Leftovers
After serving, store any leftover cake covered in the refrigerator. Because of the whipped topping and pudding, it will stay fresh and moist for up to three days, making it a fantastic make-ahead dessert that tastes just as good the next day.
Freezing
If you want to keep it longer, this cake can be frozen. Wrap it tightly with plastic wrap and a layer of foil to prevent freezer burn. When properly stored, it can last up to one month. Thaw it in the refrigerator overnight before serving for the best texture and flavor.
Reheating
This cake is meant to be enjoyed chilled, so reheating isn’t recommended. Instead, allow it to come to room temperature for about 15 minutes if you prefer a softer texture before digging in.
FAQs
Can I use homemade brownies instead of a box mix?
Absolutely! Homemade brownies make this recipe even more special and allow you to customize the flavor. Just be sure they’re fully cooled before crumbling to maintain the right texture.
Is it possible to use low-fat milk or non-dairy milk?
You can substitute low-fat or non-dairy milk, but keep in mind the pudding may not set up as firmly. Whole milk gives the richest, creamiest pudding consistency.
Can I add other toppings to this cake?
Yes! Feel free to get creative with shredded coconut, mini chocolate chips, or even caramel drizzle to tailor the cake to your taste preferences.
How long should I refrigerate this cake before serving?
For best results, refrigerate for at least four hours or preferably overnight to let all the layers meld perfectly and the pudding to set.
Can I make this cake in individual servings?
Definitely! Layer the ingredients in small clear cups or jars for an adorable and convenient way to serve guests individually.
Final Thoughts
This Brownie Refrigerator Cake Recipe is one of those rare treats that’s incredibly easy to make yet feels like a luxurious, special occasion dessert. Its blend of fudgy brownies, creamy pudding, and airy whipped topping creates a texture and flavor combination that will have everyone asking for seconds. Whether you’re whipping it up for a family gathering or a casual weeknight treat, I encourage you to give this recipe a try—it’s truly a showstopper that brings pure joy to any dessert table.
Print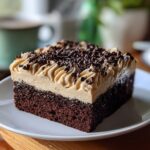
Brownie Refrigerator Cake Recipe
- Prep Time: 15 minutes
- Cook Time: 25 minutes
- Total Time: 1 hour 15 minutes including chilling
- Yield: 12 servings
- Category: Dessert
- Method: Baking
- Cuisine: American
Description
This Brownie Refrigerator Cake is a no-bake layered dessert combining moist homemade brownies, creamy chocolate pudding, and fluffy whipped topping. Perfect for a make-ahead treat that is rich, chocolatey, and delightfully easy to prepare, served chilled and garnished with optional crushed nuts for added texture.
Ingredients
Brownie Base
- 1 box brownie mix (includes eggs and oil as per package instructions)
Pudding Layer
- 2 cups chocolate pudding mix (instant)
- 2 cups whole milk
Other
- 1 cup whipped topping
- 1/2 cup crushed nuts (optional)
Instructions
- Preheat and prepare pan: Preheat your oven according to the brownie mix package instructions and grease a 9×13-inch baking pan thoroughly to prevent sticking.
- Bake brownies: Prepare the brownie mix as directed on the box, pour into the greased pan, and bake until a toothpick inserted in the center comes out clean, about the recommended time on the package. Allow the brownies to cool completely to room temperature.
- Crumble brownies: Once the brownies have cooled fully, crumble them into small, bite-sized pieces suitable for layering in a dish.
- Prepare pudding: In a medium bowl, whisk together the instant chocolate pudding mix and whole milk vigorously for about 2 minutes until the mixture thickens.
- Assemble layers: In your serving dish, evenly layer half of the crumbled brownies followed by half of the whipped topping, then half of the pudding mixture. Repeat all layers once more to build a double layer of each component.
- Chill: Cover the assembled cake with plastic wrap or a lid and refrigerate for at least four hours or overnight to allow the flavors to meld and the pudding to set firmly.
Notes
- The crushed nuts are optional but add a nice crunch and contrast to the creamy texture.
- Use full-fat milk for the pudding to achieve the best creamy consistency.
- This dessert must be refrigerated and served cold for optimal texture and flavor.
- If you prefer, substitute whipped topping with fresh whipped cream for a homemade touch.
- Ensure brownies are completely cooled before crumbling to avoid sogginess.


