
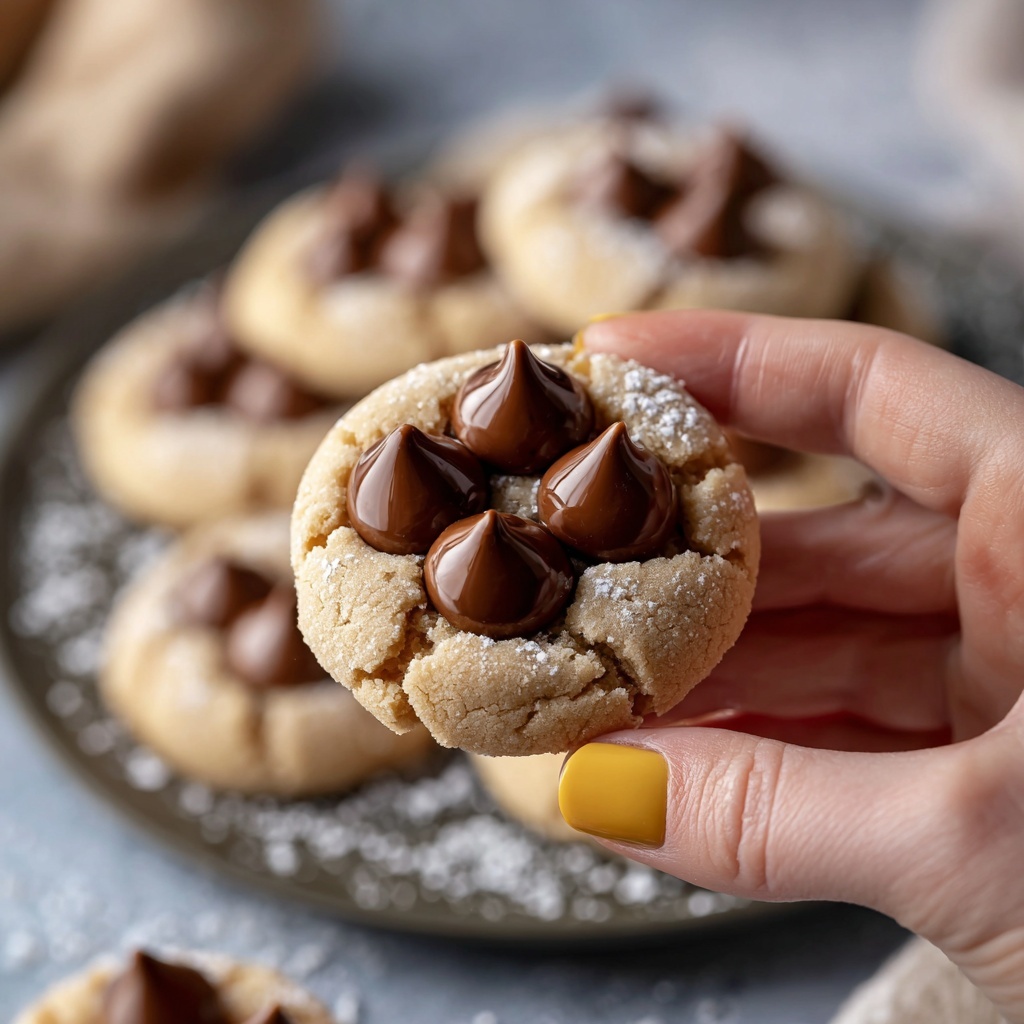
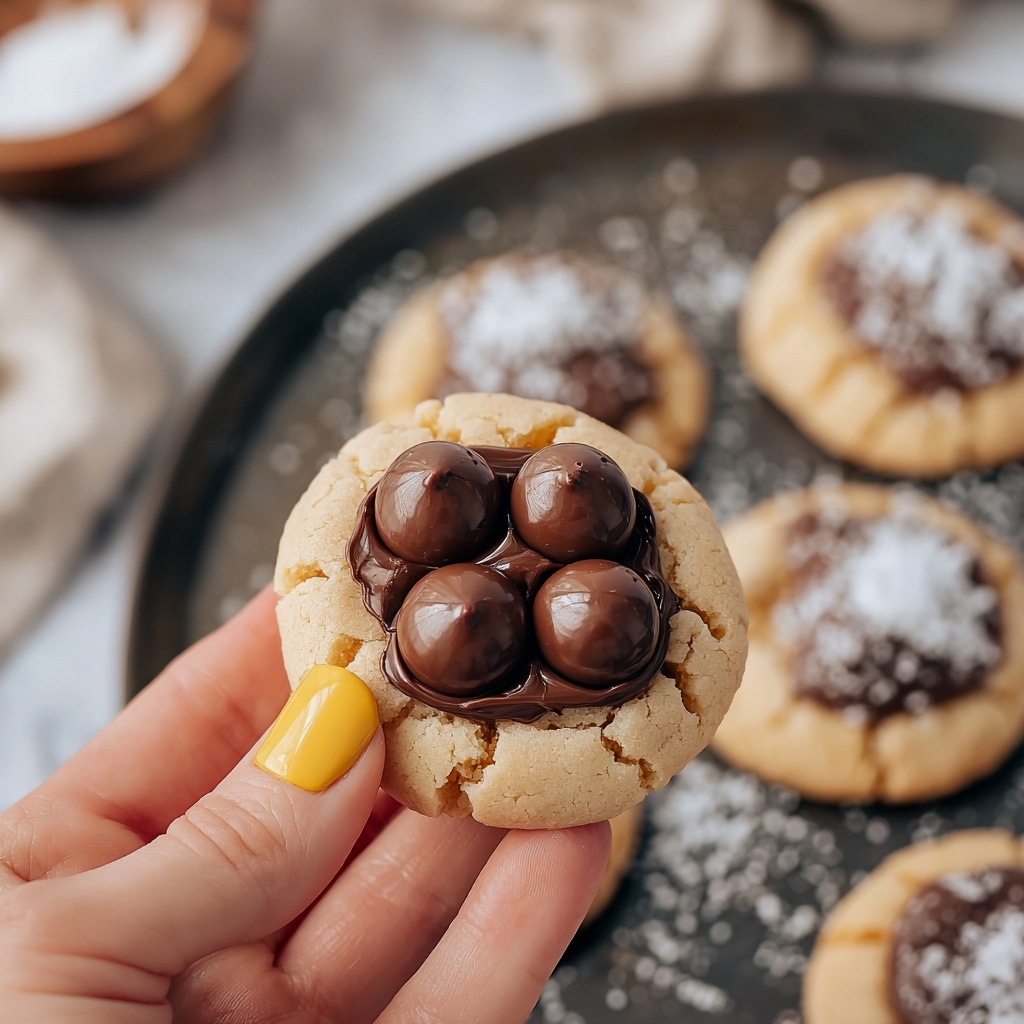
If you have a soft spot for peanut butter and chocolate, you are going to absolutely adore this Bear Paw Peanut Butter Blossom Cookies Recipe. These cookies offer the perfect balance of rich peanut butter flavor and sweet chocolate, all wrapped up in a tender, chewy bite that melts in your mouth. The delightful paw print detail made with chocolate chips adds a whimsical touch that makes these treats not only delicious but utterly charming. Whether you’re baking for a crowd or just want a fun dessert to brighten your day, this recipe delivers classic comfort cookie vibes with a playful twist you’ll want to share over and over.
Ingredients You’ll Need
This Bear Paw Peanut Butter Blossom Cookies Recipe relies on simple, everyday ingredients that come together to create a cookie that’s bursting with flavor and texture. Each element has a purposeful role, from the creamy peanut butter setting the rich foundation to the baking soda ensuring a perfect rise and tenderness.
- Butter (1/2 cup, softened): Adds richness and helps create a soft cookie texture.
- Creamy peanut butter (1 cup): The star ingredient that brings classic flavor and moisture.
- Granulated sugar (1 cup): Provides sweetness and helps with cookie structure.
- Light brown sugar (1/2 cup, packed): Adds a hint of molasses flavor and extra chewiness.
- Large eggs (2): Bind the dough together and contribute to the cookie’s tenderness.
- Vanilla extract (1/2 teaspoon): Enhances depth of flavor and rounds out the peanut butter notes.
- All-purpose flour (2 cups): The base of the dough, offering structure and balance.
- Baking soda (2 teaspoons): Helps the cookies rise perfectly while keeping them soft.
- Salt (1/2 teaspoon): Balances the sweetness and boosts the peanut butter flavors.
- Chocolate melting disks (48 disks): Creates the classic blossom top that melts just right.
- Chocolate chips (144 chips): Used to craft the adorable paw prints that make this recipe unique.
How to Make Bear Paw Peanut Butter Blossom Cookies Recipe
Step 1: Preheat and Prepare
Start by heating your oven to 350°F (175°C) and lining your baking sheets with parchment paper. This step ensures your cookies bake evenly and come off the sheet easily without sticking, making cleanup a breeze.
Step 2: Make the Peanut Butter Cookie Dough
In a large mixing bowl, combine softened butter, creamy peanut butter, granulated sugar, and packed light brown sugar. Beat them together until the mixture is smooth and creamy, creating a luscious base. Next, add the eggs and vanilla extract and mix just until fully incorporated; these ingredients bring moistness and subtle sweetness that enrich the dough.
Step 3: Mix Dry Ingredients and Combine
In a separate bowl, whisk together the all-purpose flour, baking soda, and salt. This dry mix ensures your cookies achieve that perfect rise and stay tender. Gradually add the dry ingredients into your peanut butter mixture, stirring gently until just combined to avoid overworking the dough and keeping your cookies soft and chewy.
Step 4: Shape the Cookies
Scoop rounded tablespoons of dough onto your prepared baking sheets, leaving about 2 inches between each for spreading. If you want a little extra sparkle and crunch, roll the dough balls lightly in granulated sugar before placing them on the sheet. This coating adds a subtle texture contrast that complements the soft cookie interior beautifully.
Step 5: Bake and Create the Paw Print
Bake your cookies for 7 to 9 minutes until they are just puffy and soft—but don’t let them brown too much. Immediately after removing them from the oven, gently press one chocolate melting disk into the center of each cookie. Then, add three chocolate chips above the disk to form an adorable paw print. Allow the cookies to cool on wire racks, letting the chocolate set and the cookies firm up slightly.
How to Serve Bear Paw Peanut Butter Blossom Cookies Recipe
Garnishes
While the chocolate paw print adds a lot of character, you can elevate presentation by sprinkling a tiny pinch of flaky sea salt over the cookies just before serving. The salt will amplify the peanut butter’s savory notes and balance the sweetness for a truly complex bite.
Side Dishes
These cookies pair wonderfully with a cold glass of milk or a warm cup of vanilla-flavored coffee or tea. If you’re serving these at a party or family gathering, consider adding fresh fruit like sliced apples or berries on the side for a refreshing contrast that complements the rich cookie flavors.
Creative Ways to Present
For a fun twist, arrange your Bear Paw Peanut Butter Blossom Cookies Recipe in a circular pattern on a platter with “toes” facing outward, mimicking an actual bear paw. You can also package individual cookies in small cello bags with a festive ribbon for gifting or party favors that will delight guests.
Make Ahead and Storage
Storing Leftovers
Place any uneaten cookies in an airtight container at room temperature. They stay soft and fresh for up to five days, making them a perfect treat to enjoy throughout the week without losing that freshly baked charm.
Freezing
If you want to keep these cookies longer, freeze them unbaked as dough balls or fully baked cookies in a single layer on a baking sheet. Once solid, transfer them to a freezer-safe bag or container. They freeze beautifully for up to three months, ensuring you have a batch of Bear Paw Peanut Butter Blossom Cookies Recipe ready whenever a peanut butter craving strikes.
Reheating
To bring back that fresh-baked warmth, pop your cookies in the microwave for about 10 to 15 seconds. This softens the chocolate slightly and revives the cookie’s tender texture, giving you that just-out-of-the-oven feeling any time.
FAQs
Can I use crunchy peanut butter instead of creamy?
Absolutely! Using crunchy peanut butter will add some delightful texture bits to your cookies, making each bite even more interesting. Just be mindful it may slightly change the softness of the final cookie.
What if I don’t have chocolate melting disks?
If you can’t find chocolate melting disks, use good-quality chocolate chips or chopped chocolate as a substitute. Just press them gently into the warm cookies, and they’ll melt just as nicely.
Can I make these cookies gluten-free?
Yes, swap the all-purpose flour for a gluten-free flour blend that measures 1:1. Make sure your baking soda and other ingredients are gluten-free certified, and you’ll have delicious gluten-free Bear Paw Peanut Butter Blossom Cookies.
How do I prevent the cookies from spreading too much?
If your cookies are spreading too much, chill the dough for about 30 minutes before baking. This helps maintain the cookie’s shape so the paw prints look perfect after baking.
Can I double the recipe for a larger batch?
Definitely! This Bear Paw Peanut Butter Blossom Cookies Recipe scales well. Just make sure to mix ingredients thoroughly and use multiple baking sheets to avoid crowding in the oven.
Final Thoughts
I can’t recommend this Bear Paw Peanut Butter Blossom Cookies Recipe enough if you want to impress friends or treat yourself to a cozy, nostalgic dessert. The blend of peanut butter richness with that touch of chocolate paw print fun is simply irresistible. Give it a try—you might just find your new go-to cookie for any occasion.
Print
Bear Paw Peanut Butter Blossom Cookies Recipe
- Prep Time: 12 minutes
- Cook Time: 9 minutes
- Total Time: 21 minutes
- Yield: 48 cookies
- Category: Dessert
- Method: Baking
- Cuisine: American
Description
Delightfully soft and chewy Bear Paw Peanut Butter Blossom Cookies feature a rich peanut butter base topped with a chocolate disk and decorated with chocolate chips to create an adorable paw print. Perfect for parties or anytime you crave a nutty, chocolatey treat.
Ingredients
Cookie Dough
- 1/2 cup butter, softened
- 1 cup creamy peanut butter
- 1 cup granulated sugar
- 1/2 cup light brown sugar, packed
- 2 large eggs
- 1/2 teaspoon vanilla extract
- 2 cups all-purpose flour
- 2 teaspoons baking soda
- 1/2 teaspoon salt
Decoration
- 48 chocolate melting disks
- 144 chocolate chips
Instructions
- Preheat Oven: Preheat your oven to 350°F (175°C). Line baking sheets with parchment paper to prevent sticking and ensure even baking.
- Prepare Dough: In a large bowl, beat together the softened butter, creamy peanut butter, granulated sugar, and light brown sugar until the mixture is smooth and creamy. Then mix in the eggs and vanilla extract until fully combined.
- Combine Dry Ingredients: In a separate bowl, whisk together the all-purpose flour, baking soda, and salt. Gradually add these dry ingredients to the peanut butter mixture, mixing until just combined to avoid overworking the dough.
- Shape and Bake: Using a spoon or cookie scoop, scoop rounded tablespoons of cookie dough onto the prepared baking sheets, spacing them about 2 inches apart to allow for spreading. For an optional extra slight crunch, roll the dough balls in sugar before placing them on the sheets. Bake the cookies for 7 to 9 minutes until they are puffy and soft, but not browned.
- Decorate: Immediately after removing cookies from the oven, press one chocolate melting disk into the center of each warm cookie. Then, decorate each cookie by placing three chocolate chips around the disk to form a paw print pattern. Transfer the cookies to wire racks to cool completely.
Notes
- For best results, use room temperature butter to ensure proper creaming with the sugars.
- You can substitute creamy peanut butter with natural peanut butter, but the texture of the cookies may be slightly different.
- If chocolate melting disks are unavailable, use chocolate candy melts or large chocolate buttons.
- Store cookies in an airtight container at room temperature for up to one week.
- For extra flair, sprinkle a pinch of flaky sea salt on each chocolate disk immediately after decoration.

