
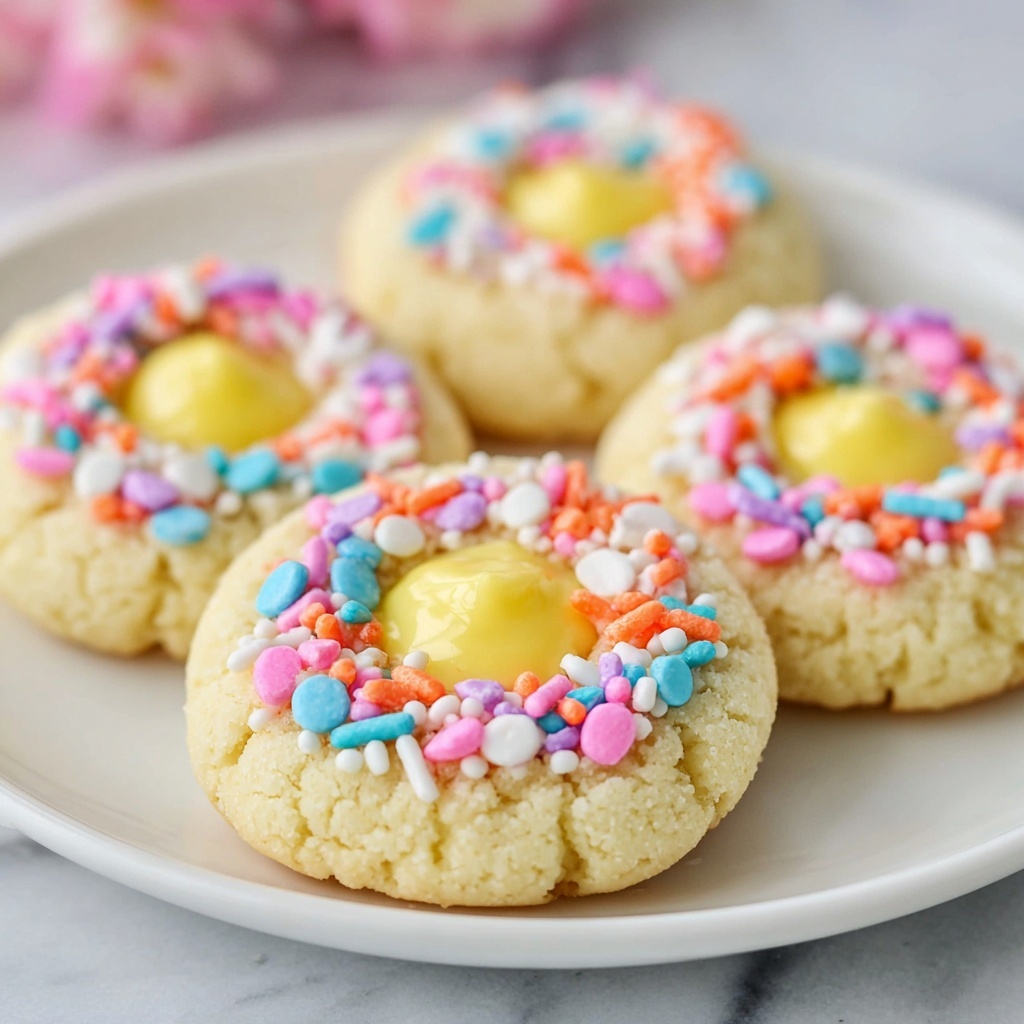
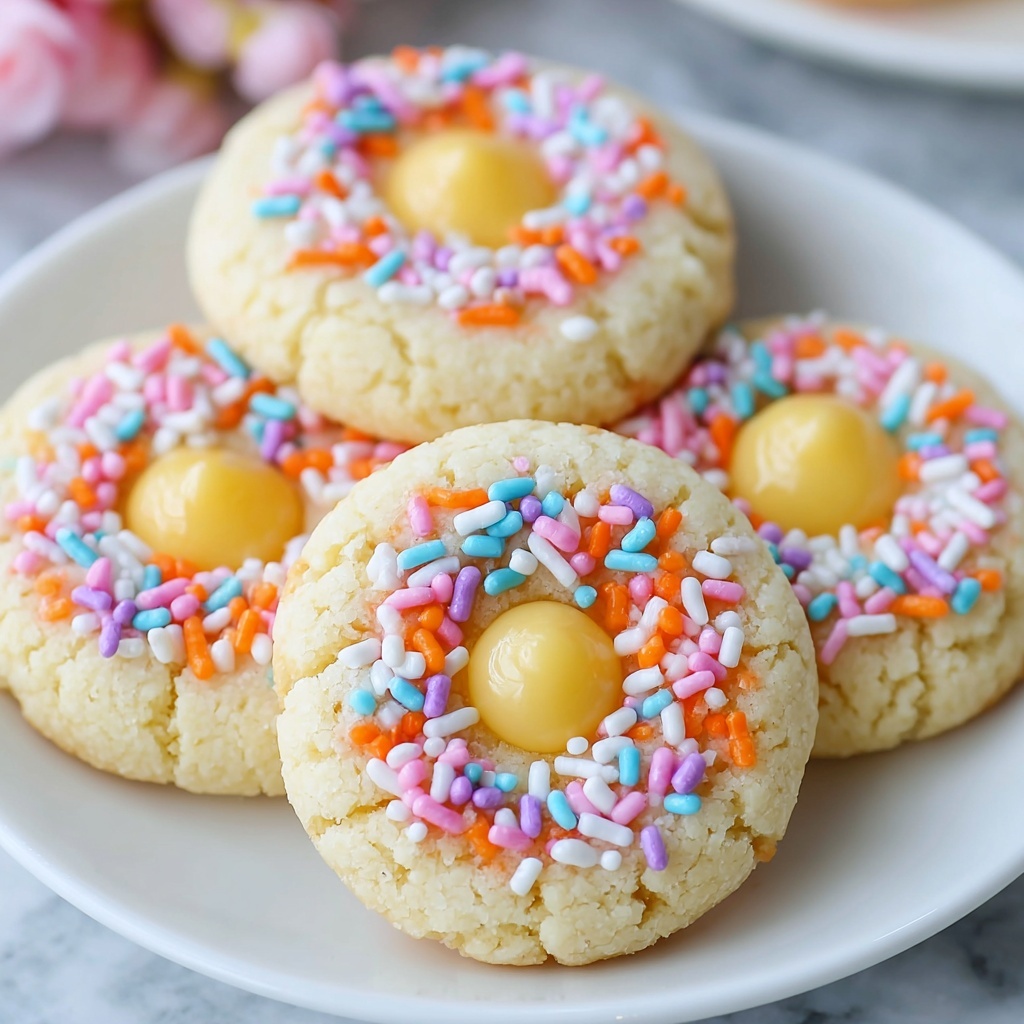
There is something truly magical about an Easter Thumbprint Cookies Recipe that brings a burst of color, sweetness, and nostalgia right to your kitchen. These delightful little treats are soft, buttery, and perfectly adorned with pastel sprinkles and candy-coated eggs that scream springtime celebration. Whether you’re baking for an Easter gathering or just to brighten up your day, this recipe combines simple ingredients into an unforgettable cookie that’s as fun to make as it is to eat.
Ingredients You’ll Need
The magic of these Easter Thumbprint Cookies lies in the simplicity and quality of each ingredient. Every item plays a crucial role in providing the perfect balance of texture, flavor, and festive appearance. Let’s take a closer look at what you’ll need to create these charming treats.
- 1 cup unsalted butter, softened: Provides that rich, creamy base and tender crumb that makes the cookies melt in your mouth.
- ½ cup granulated sugar: Adds sweetness and helps to create a soft, delicate texture.
- 2 large egg yolks: Lends richness and binds the dough for a perfect consistency.
- 1 teaspoon vanilla extract: Infuses the dough with a warm, inviting aroma and flavor.
- 2 cups all-purpose flour: The backbone of the dough, giving structure without toughness.
- ¼ teaspoon salt: Balances the sweetness and enhances all other flavors.
- ½ cup pastel-colored sprinkles (optional): Adds a whimsical pop of color and a light crunch.
- ½ cup white chocolate or candy melts: Perfect for filling the thumbprint and adding creamy sweetness.
- Pastel-colored candy-coated chocolate eggs: The signature festive topping that completes this charming Easter cookie.
How to Make Easter Thumbprint Cookies Recipe
Step 1: Prepare the Oven and Cream the Butter and Sugar
Start by preheating your oven to 350°F and lining two baking sheets with parchment paper to prevent sticking. In a large mixing bowl, cream the softened butter together with the sugar until the mixture is airy and pale. This step is essential for fluffy, tender cookies, so take your time and really beat those two ingredients together.
Step 2: Add Egg Yolks and Vanilla Extract
Next, add in the egg yolks and vanilla extract to the butter and sugar mixture. These will enrich the dough with moisture and flavor. Mix until everything is completely smooth and well combined—this smoothness is key to an even dough texture that’s easy to work with.
Step 3: Incorporate Dry Ingredients
Slowly add the all-purpose flour and salt to your wet mixture. Stir gently but thoroughly until a soft, cohesive dough forms. This is where the structure for your cookies begins to take shape, so be sure not to overmix, or you might end up with a tougher cookie.
Step 4: Shape the Dough and Create the Thumbprints
Scoop tablespoon-sized portions of dough and roll them into smooth balls. If you want an extra festive look, roll these balls in pastel sprinkles before placing them onto your baking sheets, spacing them about 2 inches apart. Now comes the fun part: use your thumb or the back of a teaspoon to press a gentle indentation in the center of each ball. This is what will hold the delicious chocolate and candy eggs later on.
Step 5: Bake and Adjust Impressions
Bake your cookies for 10 to 12 minutes until the edges are just turning a light golden color. Sometimes the thumbprints puff up slightly while baking; while the cookies are still warm, gently press the indentations back down with the spoon’s back. This ensures you’ll have a perfect well for the chocolate filling once cooled.
Step 6: Add the Chocolate and Candy Eggs
Once the cookies have cooled completely on a wire rack, melt your white chocolate or candy melts in the microwave in 30-second intervals, stirring until smooth and glossy. Carefully spoon or pipe the melted chocolate into each cookie’s thumbprint, then top each with a pastel candy-coated chocolate egg. Let the chocolate set before enjoying or storing to preserve that pretty finish.
How to Serve Easter Thumbprint Cookies Recipe
Garnishes
To elevate the presentation, consider adding a sprinkle of finely chopped pistachios or a light dusting of edible glitter alongside the candy eggs. These delicate touches introduce a bit of luxe sparkle that melds beautifully with the pastel theme of the cookies.
Side Dishes
These cookies pair wonderfully with a hot cup of chamomile tea or a frothy cappuccino, perfect for an afternoon Easter gathering. Fresh fruit platters with strawberries, kiwi, and melon also complement the cookies’ sweet flavors and add a refreshing contrast.
Creative Ways to Present
Serve the cookies nestled in colorful paper liners or arrange them on a tiered cake stand for a stunning Easter dessert centerpiece. For gift-giving, stack them in clear treat bags tied with pastel ribbons to spread the joy and sweetness of this wonderful recipe.
Make Ahead and Storage
Storing Leftovers
If you have any leftovers, store them in an airtight container at room temperature for up to 4 days to keep them fresh and soft. Avoid refrigeration as it may dry out the cookies or dull the chocolate shine.
Freezing
You can freeze the baked, unfilled cookies in a single layer on a baking sheet, then transfer them to a freezer-safe bag once firm. Freeze up to 2 months. When ready, thaw completely before adding melted chocolate and candy eggs.
Reheating
When you want to enjoy them later, simply let the cookies come to room temperature naturally; no reheating is necessary because these cookies taste best soft and fresh. If you like chocolate a bit melty, a quick 5-second zap in the microwave can refresh that gooey texture.
FAQs
Can I use different types of chocolate for the filling?
Absolutely! White chocolate or candy melts are traditional, but you can switch things up with milk or dark chocolate if you prefer. Just make sure to melt it gently to keep the smooth texture perfect for your thumbprint centers.
What if I don’t have pastel-colored sprinkles?
No worries at all! These sprinkles add a fun festive touch, but you can leave them out or substitute with colored sugar or coconut flakes dyed with food coloring for a similar Easter vibe.
Are these cookies gluten-free?
This particular recipe uses all-purpose flour, which contains gluten. However, you can try gluten-free flour blends designed for baking to adapt it. Just keep in mind the texture might shift slightly depending on the blend.
How do I prevent the thumbprints from rising too much?
Pressing down the indentations again while the cookies are still warm is a key trick. Also, don’t make the indentations too shallow before baking, so they hold their shape during rising.
Can I make this recipe vegan?
To veganize the Easter Thumbprint Cookies Recipe, swap the butter for a plant-based spread, use a flaxseed or chia egg in place of yolks, and select vegan white chocolate or candy melts. These changes will make it friendly to vegan diets while maintaining that delicious flavor.
Final Thoughts
There’s just something heartwarming about making and sharing an Easter Thumbprint Cookies Recipe with friends and family. It’s a fun, joyful way to celebrate spring, full of sweet, buttery goodness and colorful charm. Give this recipe a try—you’ll love its simplicity and the smiles it brings to any occasion.
Print
Easter Thumbprint Cookies Recipe
- Prep Time: 20 minutes
- Cook Time: 12 minutes
- Total Time: 32 minutes
- Yield: 24 cookies
- Category: Dessert
- Method: Baking
- Cuisine: American
- Diet: Vegetarian
Description
Delight in these charming Easter Thumbprint Cookies, beautifully adorned with pastel sprinkles and candy-coated eggs. Soft, buttery, and perfectly sweet, these festive treats are a perfect addition to your spring celebrations or holiday dessert table.
Ingredients
Cookie Dough
- 1 cup unsalted butter, softened
- ½ cup granulated sugar
- 2 large egg yolks
- 1 teaspoon vanilla extract
- 2 cups all-purpose flour
- ¼ teaspoon salt
- ½ cup pastel-colored sprinkles (optional)
Decoration
- ½ cup white chocolate or candy melts
- Pastel-colored candy-coated chocolate eggs (like mini eggs or similar)
Instructions
- Preheat and prepare baking sheets: Preheat your oven to 350°F (175°C) and line two baking sheets with parchment paper to prevent sticking.
- Cream butter and sugar: In a large bowl, cream together the softened butter and granulated sugar until the mixture becomes light and fluffy, creating a smooth base for the dough.
- Add egg yolks and vanilla: Mix in the two egg yolks and the vanilla extract, blending thoroughly to achieve a smooth consistency.
- Incorporate dry ingredients: Gradually add the all-purpose flour and salt into the wet mixture, stirring gently until a soft dough forms without overmixing.
- Form dough balls and add sprinkles: Scoop tablespoon-sized portions of the dough and roll each into a ball. If you like, roll the dough balls in pastel sprinkles to add colorful texture.
- Indent dough balls: Place the balls on the prepared baking sheets about 2 inches apart. Using your thumb or the back of a teaspoon, gently press a small indentation into the center of each ball for the filling.
- Bake the cookies: Bake in the preheated oven for 10–12 minutes, or until the cookie edges turn lightly golden. If the indentations puff up, press them down gently again while cookies are still warm.
- Cool completely: Transfer the cookies to a wire rack and let them cool completely before decorating.
- Melt white chocolate: Melt the white chocolate or candy melts in the microwave in 30-second intervals, stirring between each until smooth and fully melted.
- Fill and decorate: Spoon or pipe a small amount of melted white chocolate into the center indentation of each cookie and press a pastel-colored candy egg into the chocolate.
- Set and serve: Allow the chocolate to set fully before serving or storing the cookies in an airtight container.
Notes
- Customize with different colors of candy eggs or sprinkles to suit various holidays or celebrations.
- Store cookies in an airtight container at room temperature for up to 4 days to maintain freshness.


