
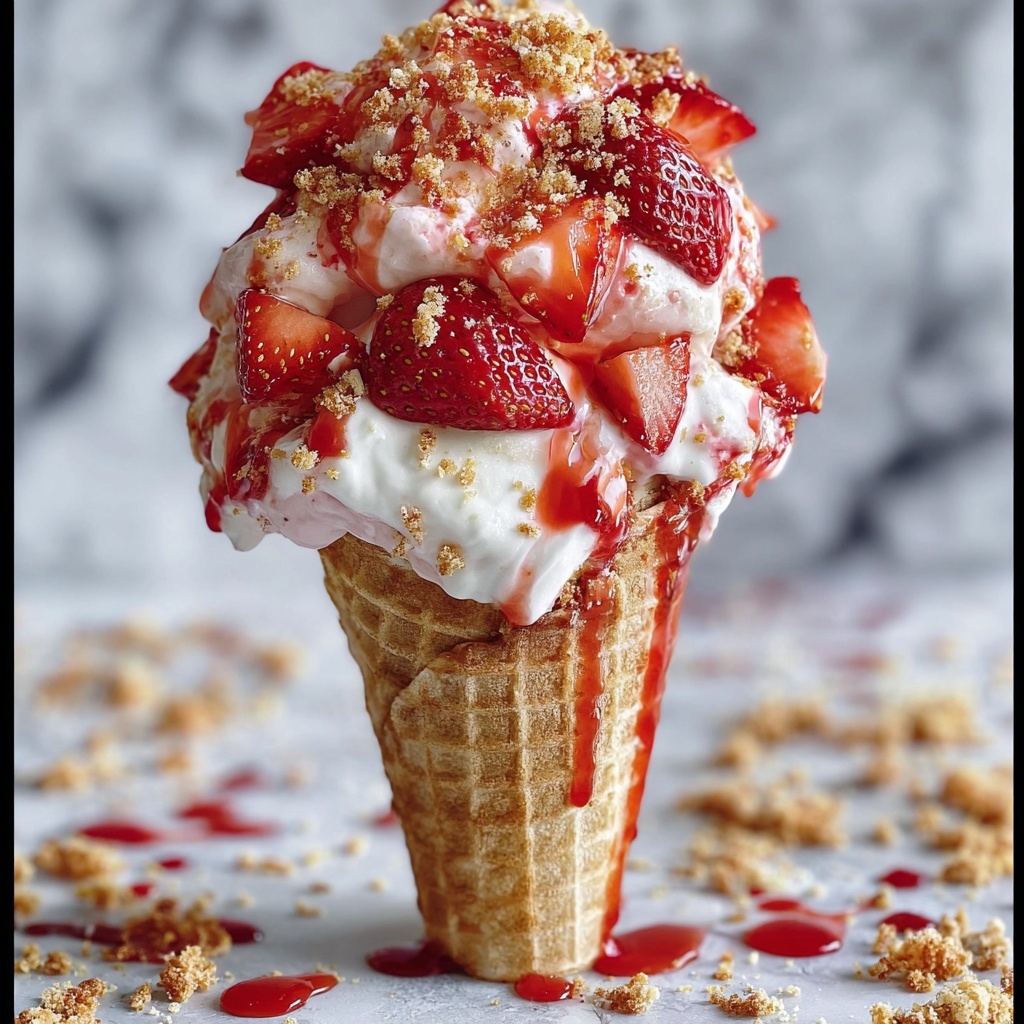
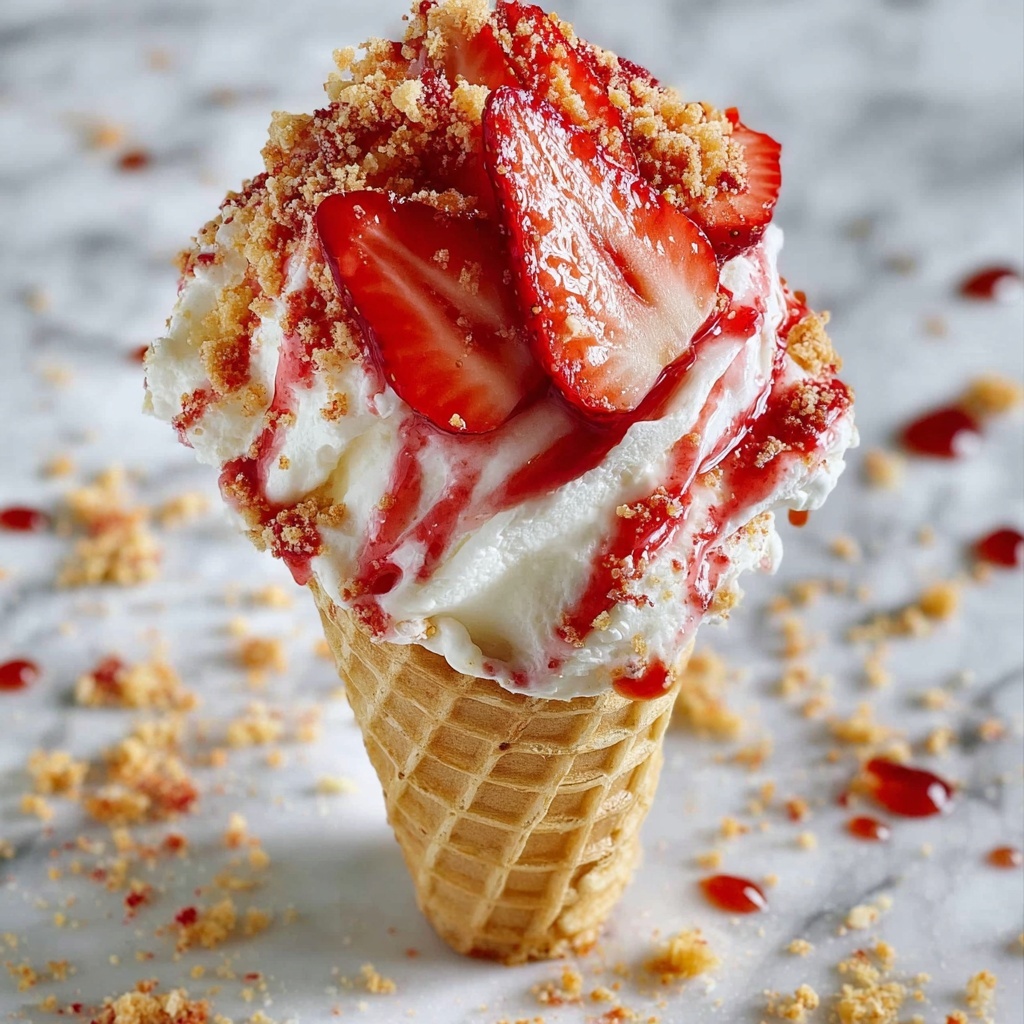
If you’re looking for a fun, crowd-pleasing dessert that bursts with flavor and texture, this Strawberry Crunch Cheesecake Cones Recipe is absolutely perfect for you. Imagine a crisp waffle cone dipped in luscious white chocolate, lavishly coated with a crunchy strawberry topping, and filled to the brim with creamy no-bake cheesecake filling swirled with fresh strawberries and strawberry glaze. It’s like the best parts of cheesecake and ice cream cones combined into one irresistible treat that’s perfect for summer parties, family gatherings, or simply delighting yourself after a long day.
Ingredients You’ll Need
This recipe relies on a few simple, thoughtfully chosen ingredients that come together to create a symphony of taste and texture. Each component plays a crucial role, from the crunchy cone to the smooth cheesecake filling, making every bite a joyful experience.
- 6 Waffle or Sugar Cones: Use sturdy cones that can hold all the fillings without getting soggy too quickly.
- 5 oz White Chocolate, melted: Acts as a glue and adds creamy sweetness while giving a glossy finish.
- 1 cup Strawberry Crunch Topping: Provides that signature crunchy strawberry bite that makes this dessert stand out.
- 24 oz No Bake Cheesecake Filling (premade or homemade): The luscious and creamy base that fills the cones with cheesecake goodness.
- 6-8 strawberries, diced: Fresh strawberries add a burst of natural sweetness and freshness inside the cones.
- Strawberry Glaze or Sauce, as needed: Adds a glossy, tangy finish that ties all the flavors together beautifully.
How to Make Strawberry Crunch Cheesecake Cones Recipe
Step 1: Melt the White Chocolate
Start by melting the white chocolate carefully following the package directions until it’s smooth and pourable. This is what will help the strawberry crunch topping cling perfectly to the cones and add that rich creaminess to the coating.
Step 2: Coat the Cones
Dip the tops of your waffle or sugar cones into the melted white chocolate, ensuring the chocolate covers the rim well but not dripping excessively. Then tap off any excess chocolate for a clean, even layer.
Step 3: Add Strawberry Crunch
Immediately roll the freshly dipped white chocolate edge of each cone into the strawberry crunch topping. This step is key—do it quickly so the crunch sticks well before the chocolate begins to set.
Step 4: Set the Cones
Place the coated cones upright on a parchment-lined baking sheet and let them sit for 5 to 10 minutes until the white chocolate hardens. This forms a firm barrier to keep the cone crisp and ready to hold the creamy filling.
Step 5: Prepare the Filling Bag
Transfer the no-bake cheesecake filling to a piping bag or a sturdy Ziploc bag; snip one corner off for easy, controlled filling. This simple trick helps you avoid mess and lets you fill the cones neatly.
Step 6: Initial Filling
Pipe cheesecake filling halfway into each cone, creating a creamy base. Then spoon a bit of strawberry glaze and sprinkle some diced strawberries on top for a fresh and fruity surprise in the middle.
Step 7: Final Filling
Continue piping the no-bake cheesecake filling to completely fill the cones to the top. Add more strawberry glaze and diced strawberries on the surface for a vibrant and inviting look.
Step 8: Finish & Decorate
Sprinkle extra strawberry crunch topping generously on top. If you want to go the extra mile, drizzle more melted white chocolate and toss on a final dusting of crunch to create a dazzling finish that’s as delightful to look at as it is to eat.
Step 9: Chill & Serve
Chill the assembled cones in the refrigerator for at least 10 to 20 minutes before serving. This ensures the cheesecake filling firms up perfectly, making every bite creamy and delicious without losing the satisfying crunch of the cone.
How to Serve Strawberry Crunch Cheesecake Cones Recipe
Garnishes
Serve these cones with additional fresh strawberry slices or a light dusting of powdered sugar on top to enhance their appearance and flavor. A drizzle of strawberry glaze just before serving adds a lovely shine and extra sweetness that guests will adore.
Side Dishes
This dessert pairs wonderfully with a simple fresh fruit salad or a scoop of vanilla ice cream. Both options complement the creamy cheesecake filling and crunchy topping, balancing the textures and flavors perfectly without overpowering the cones.
Creative Ways to Present
Try serving the cones in a tall glass or vase to keep them upright and stylishly displayed. You can also arrange them on a cake stand surrounded by edible flowers or strawberry slices for a beautiful centerpiece that’s sure to impress at any party or gathering.
Make Ahead and Storage
Storing Leftovers
If you have any leftover Strawberry Crunch Cheesecake Cones Recipe treats, store them in an airtight container in the refrigerator. They’re best enjoyed within 1 to 2 days to keep the cones from getting soggy and the filling fresh.
Freezing
Freezing is possible but not ideal because the cones might lose their crunch. If you do freeze, wrap each cone tightly in plastic wrap and place them in a freezer-safe container for up to one month. Thaw in the fridge before serving.
Reheating
Since this is a no-bake chilled dessert, reheating is not recommended. Instead, simply let the cones sit at room temperature for about 10 minutes before serving if they’ve been refrigerated too long, to bring out their best texture and flavor.
FAQs
Can I use a different type of chocolate?
Absolutely! If you prefer, you can use milk or dark chocolate, but white chocolate pairs beautifully with the strawberry flavor and keeps the dessert light and sweet.
Is homemade no-bake cheesecake filling better than store-bought?
Homemade filling adds a fresh touch and lets you control sweetness and texture, but premade varieties work wonderfully for a quick and easy version without sacrificing taste.
How do I prevent the cones from becoming soggy?
Dipping the cones in melted white chocolate creates a moisture barrier. Make sure the chocolate coating is thick enough and fully hardened before adding the filling to keep crunchiness intact.
Can I make this recipe vegan or dairy-free?
Yes, by using vegan white chocolate and a plant-based cheesecake filling, you can adapt this recipe. Just ensure the strawberry crunch topping is also free from animal products.
What’s the best way to dice strawberries for this recipe?
Use ripe but firm strawberries, washing them thoroughly, removing the stems, and cutting them into small, uniform pieces for an even distribution inside the cones.
Final Thoughts
This Strawberry Crunch Cheesecake Cones Recipe is a dazzling dessert that will brighten any occasion with its creamy, crunchy, and fruity layers. It’s simple, fun, and guaranteed to bring lots of smiles. Give it a try and watch your friends and family fall in love with every bite of this joyful treat!
Print
Strawberry Crunch Cheesecake Cones Recipe
- Prep Time: 15 minutes
- Cook Time: 0 minutes
- Total Time: 20 minutes
- Yield: 6 servings
- Category: Dessert
- Method: No-Cook
- Cuisine: American
- Diet: Vegetarian
Description
These Strawberry Crunch Cheesecake Cones are a delightful and visually appealing no-bake dessert perfect for parties or a fun family treat. Crisp waffle or sugar cones are dipped in melted white chocolate and coated with crunchy strawberry topping, then filled with creamy no-bake cheesecake filling and fresh strawberries, finished with strawberry glaze and extra crunch for a burst of flavor and texture in every bite.
Ingredients
Cones and Coating
- 6 Waffle or Sugar Cones
- 5 oz White Chocolate, melted
- 1 cup Strawberry Crunch Topping
Cheesecake Filling & Toppings
- 24 oz No Bake Cheesecake Filling (premade or homemade)
- 6–8 Strawberries, diced
- Strawberry Glaze or Sauce, as needed
Instructions
- Melt the White Chocolate: Melt the white chocolate according to the package directions until it is smooth and easily pourable for coating the cones.
- Coat the Cones: Dip the top part of each waffle or sugar cone into the melted white chocolate, tapping off any excess chocolate carefully to avoid drips.
- Add Strawberry Crunch: Immediately roll the white chocolate coated part of each cone into the strawberry crunch topping so it adheres firmly to the chocolate.
- Set the Cones: Place the coated cones upright on a parchment-lined baking sheet and allow them to harden and set for 5-10 minutes until the chocolate is firm.
- Prepare the Filling Bag: Transfer the no-bake cheesecake filling into a piping bag or a Ziploc bag with a snipped corner to enable easy and controlled filling of the cones.
- Initial Filling: Pipe cheesecake filling halfway into each cone. Add a small spoonful of strawberry glaze and a few fresh diced strawberry pieces over the filling.
- Final Filling: Continue piping more cheesecake filling to fill the cones fully to the top, then add additional strawberry glaze and diced strawberries on top for fresh flavor.
- Finish & Decorate: Sprinkle extra strawberry crunch topping on the filled cones, optionally drizzle some more melted white chocolate, and add a final dusting of crunch topping for added texture and visual appeal.
- Chill & Serve: Refrigerate the assembled cones for 10-20 minutes prior to serving to allow the cheesecake filling to set and to enhance the overall texture and taste.
Notes
- Use store-bought or homemade no-bake cheesecake filling depending on preference.
- Ensure the white chocolate is smoothly melted for even coating on the cones.
- Chilling time can be extended up to 30 minutes for firmer filling texture.
- These cones should be served chilled for best taste and to prevent melting.
- Strawberry crunch topping can be substituted with crushed freeze-dried strawberries mixed with crushed cereal for a homemade version.


